Setup an MCP with AI-SDK v5 and Vercel MCP Handlers
Model Context Protocol (MCP) allows AI agents to discover and retrieve context hosted on an internal or a remote API server. In this section, we'll setup our Next.js app to also serve as an MCP server using Vercel's MCP Handlers, allowing us to expose some of our shared tools as MCP tools and secure them with Auth0.
Key Benefits
🌐 Interoperable across the whole MCP ecosystem: Tools are exposed through the open MCP standard, making them usable by any MCP-capable client (ChatGPT apps, Claude Code, GitHub Copilot, and other native AI tools & agentic frameworks).
🔒 Secure by design: Tools can be protected with OAuth/OIDC using short-lived access tokens, and role-based access controls & fine-grained permissions for true least-privilege access.
🏗️ No additional infrastructure: MCP server functionality is built directly into your Next.js app using Vercel's MCP Handlers, so no need to stand up separate infrastructure. Vercel's MCP Handlers let you turn any Vercel serverless function into a discoverable, standards-compliant MCP resource.
🤝 Supports Dynamic Client Registration (DCR) & simple onboarding: Agents can register securely with Auth0 without manual setup, enabling frictionless, scalable multi-agent access.
🔄 Secure token exchange for downstream APIs: MCP servers can safely exchange user tokens to call downstream APIs on the user’s behalf.
📦 Clean, standardized context sharing: MCP gives you a structured way to expose domain context and capabilities so any agent can consume them consistently.
Here's an updated diagram including the MCP server component we'll be adding to our architecture in this section:
Setup MCP Server using mcp-handler in Next.js App
-
Install Dependencies: Start by installing the necessary dependencies for the MCP server. You'll need to ensure you have installed the
mcp-handlerand@modelcontextprotocol/sdkpackages and set up Redis for state management.Bashpnpm install --save mcp-handler @modelcontextprotocol/sdkFor Redis, you can use Docker to run a Redis instance on your local computer:
Bashdocker run -p 6379:6379 -d redisEnsure you have the Redis connection URL set in your environment variables:
ShellREDIS_URL=redis://localhost:6379 -
Configure the
.well-known/oauth-protected-resourceendpoint in your Next.js app which first tells the agent this is an OAuth protected resource and how to authorize with this MCP server. Create a new file calledroute.tsin theapp/.well-known/oauth-protected-resourcedirectory:Ts/** * OAuth 2.0 Protected Resource Metadata endpoint */ import { generateProtectedResourceMetadata, metadataCorsOptionsRequestHandler, } from "mcp-handler"; import { AUTH0_DOMAIN, corsHeaders } from "../../../lib/config"; // Define supported scopes for this MCP server const SUPPORTED_SCOPES = [ // tool scopes "trade:read", "portfolio:read", ]; /** Create custom handler with scopes support based on protectedResourceHandler mcp-handler helper: https://github.com/vercel/mcp-handler/blob/main/src/auth/auth-metadata.ts#L22 */ const handler = (req: Request) => { const resourceUrl = new URL(req.url); // Remove the .well-known path to get the resource identifier resourceUrl.pathname = resourceUrl.pathname.replace( /^\/\.well-known\/[^\/]+/, "" ); const resource = resourceUrl.pathname === "/" ? resourceUrl.toString().replace(/\/$/, "") : resourceUrl.toString(); const metadata = generateProtectedResourceMetadata({ authServerUrls: [`https://${AUTH0_DOMAIN}/`], resourceUrl: `${resource}/mcp`, additionalMetadata: { scopes_supported: SUPPORTED_SCOPES, // Optional: add other metadata fields jwks_uri: `https://${AUTH0_DOMAIN}/.well-known/jwks.json`, }, }); return new Response(JSON.stringify(metadata), { headers: corsHeaders, }); }; // Use the built-in CORS handler const optionsHandler = metadataCorsOptionsRequestHandler(); export { handler as GET, optionsHandler as OPTIONS }; -
Configure the
.well-known/oauth-authorization-serverendpoint in your Next.js app to serve the authorization server metadata. Create a new file calledroute.tsin theapp/.well-known/oauth-authorization-serverdirectory:Ts/** * OAuth 2.0 Authorization Server Metadata endpoint * * This endpoint ensures backwards compatibility with OAuth clients that expect * authorization server metadata at /.well-known/oauth-authorization-server */ import { discoverAuthorizationServerMetadata } from "@modelcontextprotocol/sdk/client/auth.js"; import { AUTH0_DOMAIN, corsHeaders } from "../../../lib/config"; const handler: (req: Request) => Promise<Response> = async () => { const oauthMetadata = await discoverAuthorizationServerMetadata( new URL(`https://${AUTH0_DOMAIN}`).toString() ); return new Response(JSON.stringify(oauthMetadata), { headers: corsHeaders }); }; // Create the OPTIONS handler for CORS preflight requests // This allows browsers to make cross-origin requests to this endpoint const optionsHandler = () => { return new Response(null, { status: 200, headers: corsHeaders, }); }; // Export the handlers using Nextjs App router naming convention // GET: Returns the OAuth 2.0 Authorization Server Metadata JSON // OPTIONS: Handles CORS preflight requests export { handler as GET, optionsHandler as OPTIONS }; -
We'll also go ahead and configure the legacy
/.well-known/openid-configurationendpoint to ensure compatibility with legacy OpenID Connect clients. Create a new file calledroute.tsin theapp/.well-known/openid-configurationdirectory:Ts/** * OpenID Connect Discovery endpoint * * This endpoint provides OpenID Connect metadata for clients that expect * the standard OIDC discovery endpoint at /.well-known/openid-configuration * * Many OAuth/OIDC clients (including ChatGPT) will try this endpoint first * before falling back to /.well-known/oauth-authorization-server */ import { discoverAuthorizationServerMetadata } from "@modelcontextprotocol/sdk/client/auth.js"; import { AUTH0_DOMAIN, corsHeaders } from "../../../lib/config"; // Define supported scopes for this MCP server const SUPPORTED_SCOPES = [ // tool scopes "trade:read", "portfolio:read", ]; const handler: (req: Request) => Promise<Response> = async () => { // Fetch OAuth metadata from Auth0 // Auth0's authorization server metadata includes all required OpenID Connect fields const oauthMetadata = await discoverAuthorizationServerMetadata( new URL(`https://${AUTH0_DOMAIN}`).toString() ); // Enhance the metadata with our supported scopes const enhancedMetadata = { ...oauthMetadata, scopes_supported: SUPPORTED_SCOPES, }; return new Response(JSON.stringify(enhancedMetadata), { headers: { ...corsHeaders, "Content-Type": "application/json", }, }); }; // Create the OPTIONS handler for CORS preflight requests // This allows browsers to make cross-origin requests to this endpoint const optionsHandler = () => { return new Response(null, { status: 200, headers: corsHeaders, }); }; // Export the handlers using Next.js App router naming convention // GET: Returns the OpenID Connect Discovery metadata JSON // OPTIONS: Handles CORS preflight requests export { handler as GET, optionsHandler as OPTIONS }; -
Next we'll set up some Auth0 specific middleware for verifying access tokens and requiring scopes on our MCP tool endpoints. Create a new file called
auth0-mcp.tsin thelibdirectory:Tsimport { ApiClient, VerifyAccessTokenError } from '@auth0/auth0-api-js'; import { InvalidTokenError } from '@modelcontextprotocol/sdk/server/auth/errors.js'; import { ToolCallback } from '@modelcontextprotocol/sdk/server/mcp.js'; import { CallToolResult } from '@modelcontextprotocol/sdk/types.js'; import { ZodRawShape } from 'zod'; import { AUTH0_AUDIENCE, AUTH0_DOMAIN } from './config'; import { Auth } from './types'; const auth0Mcp = createAuth0Mcp(); export default auth0Mcp; export function createAuth0Mcp() { const verify = createTokenVerifier(); const requireScopes = createScopeValidator(); return { verify, /** * Wraps an MCP tool handler to enforce required OAuth scopes. * * @example * ```typescript * // Require specific scopes * requireScopes(["tool:greet"], async (params, { authInfo }) => { * // Tool logic here * }); * * // Authentication only (no scope validation) * requireScopes([], async (params, { authInfo }) => { * // Tool logic here - just needs authenticated user * }); */ requireScopes, }; } function isNonEmptyString(value: unknown): value is string { return typeof value === 'string' && value.length > 0; } /** * Creates a JWT token verifier for Auth0-issued access tokens. * * This function returns a reusable `verify` function that validates JWT signatures, * token claims, and extracts user identity information for MCP integration. */ function createTokenVerifier() { const apiClient = new ApiClient({ domain: AUTH0_DOMAIN, audience: AUTH0_AUDIENCE, }); return async function verify(token: string): Promise<Auth> { try { const decoded = await apiClient.verifyAccessToken({ accessToken: token, }); if (!isNonEmptyString(decoded.sub)) { throw new InvalidTokenError("Token is missing 'sub' claim"); } let clientId: string | null = null; if (isNonEmptyString(decoded.client_id)) { clientId = decoded.client_id; } else if (isNonEmptyString(decoded.azp)) { clientId = decoded.azp; } if (!clientId) { throw new InvalidTokenError( "Token is missing 'client_id' or 'azp' claim" ); } return { token, clientId, scopes: typeof decoded.scope === 'string' ? decoded.scope.split(' ').filter(Boolean) : [], ...(decoded.exp && { expiresAt: decoded.exp }), extra: { sub: decoded.sub, ...(isNonEmptyString(decoded.client_id) && { client_id: decoded.client_id, }), ...(isNonEmptyString(decoded.azp) && { azp: decoded.azp }), ...(isNonEmptyString(decoded.name) && { name: decoded.name }), ...(isNonEmptyString(decoded.email) && { email: decoded.email }), }, }; } catch (error) { if (error instanceof VerifyAccessTokenError) { throw new InvalidTokenError(error.message); } throw error; } }; } /** * Wraps an MCP tool handler to enforce required OAuth scopes. * * This is a higher-order function that adds scope-based authorization to MCP tools. * It validates that the authenticated user's JWT token contains all required scopes * before allowing access to the wrapped tool. */ function createScopeValidator() { /** * Wraps a tool handler with scope validation. * This function ensures that the tool can only be executed if the user has the required OAuth scopes. */ return function requireScopes<T extends ZodRawShape>( requiredScopes: readonly string[], handler: (args: T, extra: { authInfo: Auth }) => Promise<CallToolResult> ): ToolCallback<T> { return (async (args, extra) => { // To support both context-only and payload+context handlers let context = extra; if (!extra) { context = args as Parameters<ToolCallback<T>>[1]; } if (!context.authInfo) { throw new Error('Authentication info is required to execute this tool'); } const userScopes = context.authInfo.scopes; const hasScopes = requiredScopes.every((scope) => userScopes.includes(scope) ); if (!hasScopes) { throw new Error( `Missing required scopes: ${requiredScopes.join(', ')}` ); } return handler(args as T, { authInfo: context.authInfo as Auth }); }) as ToolCallback<T>; }; } -
Our MCP tools which access the DemoTradePro Stock API above require the use of our Auth0 Custom API Client. This is a client which acts on behalf of the user and is linked with the MCP Server (API) in Auth0. The Custom API Client can securely perform token exchanges to get access tokens for the DemoTradePro Stock API using the user's delegated access token.
Let's enhance our
lib/auth0.tsfile with a new ApiClient, which the MCP Server can use to perform token exchanges on behalf of the user. Updatelib/auth0.tsto include the following code:Tsimport { Auth0Client } from "@auth0/nextjs-auth0/server"; import { ApiClient } from "@auth0/auth0-api-js"; import { AUTH0_AUDIENCE, AUTH0_DOMAIN, API_AUDIENCE, MCP_SERVER_CUSTOM_API_CLIENT_ID, MCP_SERVER_CUSTOM_API_CLIENT_SECRET, } from "./config"; // Server-side agent Auth0 client instance export const auth0 = new Auth0Client({ logoutStrategy: "oidc", authorizationParameters: { audience: AUTH0_AUDIENCE, scope: process.env.API_DEFAULT_SCOPES, prompt: "login", connection: process.env.API_OIDC_CONNECTION_NAME, }, enableConnectAccountEndpoint: true, }); // MCP Server Auth0 Custom API client instance export const auth0CustomApiClient = new ApiClient({ domain: AUTH0_DOMAIN, audience: API_AUDIENCE, clientId: MCP_SERVER_CUSTOM_API_CLIENT_ID, clientSecret: MCP_SERVER_CUSTOM_API_CLIENT_SECRET, }); /** * Helper to get delegated access token for the API * Uses the OIDC connection to get a token for the stock trading API * Note: this can only be used by the agent running running with a Next.js Auth0 session */ export async function getAccessTokenForConnection({ connection, }: { connection: string; }): Promise<string | undefined> { try { if (!auth0.getSession()) { return undefined; } /** * important: the token returned will have the default API audience for the upstream OIDC connection, e.g "https://api.stocktrade.example" * If a separate audience is needed, configure the OIDC connection in Auth0 accordingly or construct a different ApiClient with the desired audience. */ const token = await auth0.getAccessTokenForConnection({ connection }); if (!token.token) { throw new Error("Access token is not available in Auth0 Token Vault"); } return token.token; } catch (error) { console.error("Failed to get stored access token:", error); throw error; } } -
Now let's add some useful tools to our MCP server. Create a new file called
mcp-tools.tsin yourapp/api/chatdirectory, and add the following code:Tsimport { McpServer } from "@modelcontextprotocol/sdk/server/mcp.js"; import { z } from "zod"; /** * DemoTradePro Agent Tools Configuration * Centralized tool definitions for the chat agent */ import * as GetStockInfo from "@workspace/agent-utils/tools/get-stock-info"; import * as GetPortfolio from "@workspace/agent-utils/tools/get-portfolio"; // API client instance for accessing the trading platform API import { createAPIClient } from "@workspace/agent-utils"; // Custom API client import { auth0CustomApiClient } from "../../../lib/auth0"; // Auth0 MCP server instance import auth0Mcp from "../../../lib/auth0-mcp"; /** * Input schema definitions for initial tools */ const greetToolInputSchema = { name: z.string().optional().describe("The name to greet"), } as const; const emptyToolInputSchema = { // Empty object schema for tools that take no parameters } as const; const createDemoTradeProApiClient = (accessToken: string) => { return createAPIClient(process.env.API_BASE_URL!, async () => { try { const token = await auth0CustomApiClient.getAccessTokenForConnection({ connection: process.env.API_OIDC_CONNECTION_NAME!, accessToken, }); if (!token.accessToken) { throw new Error("Access token is not available in Auth0 Token Vault"); } return token.accessToken; } catch (err) { console.error("Failed to get stored access token:", err); throw err; } }); }; /** * MCP tools with scope-based authorization. */ export function registerTools(server: McpServer) { // Create tool metadata (we'll use the actual handlers in the auth wrapper) const mcpTools = [ { meta: GetStockInfo.getMCPToolMeta(), handler: GetStockInfo.getStockInfoHandler, }, { meta: GetPortfolio.getMCPToolMeta(), handler: GetPortfolio.getPortfolioHandler, }, ]; // Register all stock market tools mcpTools.forEach((tool) => { server.registerTool( tool.meta.name, { title: tool.meta.name, description: tool.meta.description, inputSchema: tool.meta.inputSchema, annotations: { readOnlyHint: true }, }, auth0Mcp.requireScopes( tool.meta.requiredScopes, async (params, { authInfo }) => { try { const apiClient = createDemoTradeProApiClient(authInfo.token); const result = await tool.handler(params as any, apiClient); return { content: [ { type: "text" as const, text: JSON.stringify(result, null, 2), }, ], }; } catch (err) { console.log(err); throw err; } } ) ); }); // additional mcp tools for testing auth0 user authentication server.registerTool( "greet", { title: "Greet Tool", description: "A tool that greets a user by name", inputSchema: greetToolInputSchema, annotations: { readOnlyHint: false }, }, /** * note: we are not requiring scopes for the whoami tool in this workshop * see the Next.js quickstart and Auth0 Tenant Setup Guide for further details on * configuring RBAC Roles and assigning scopes (permissions) to users. * https://github.com/auth0-samples/auth0-ai-samples/blob/main/auth-for-mcp/nextjs-mcp-js/README.md * https://github.com/auth0-samples/auth0-ai-samples/tree/main/auth-for-mcp/nextjs-mcp-js#auth0-tenant-setup */ auth0Mcp.requireScopes<typeof greetToolInputSchema>( [], async (payload, { authInfo }) => { const name = payload.name || "World"; const userId = authInfo.extra.sub; return { content: [ { type: "text", text: `Hello, ${name}! You are authenticated as: ${userId}`, }, ], }; } ) ); // additional mcp tools for testing auth0 user authentication server.registerTool( "whoami", { title: "Who Am I Tool", description: "A tool that returns information about the authenticated user", annotations: { readOnlyHint: false }, }, /** * note: we are not requiring scopes for the whoami tool in this workshop * see the Next.js quickstart and Auth0 Tenant Setup Guide for further details on * configuring RBAC Roles and assigning scopes (permissions) to users. * https://github.com/auth0-samples/auth0-ai-samples/blob/main/auth-for-mcp/nextjs-mcp-js/README.md * https://github.com/auth0-samples/auth0-ai-samples/tree/main/auth-for-mcp/nextjs-mcp-js#auth0-tenant-setup */ auth0Mcp.requireScopes([], async (_payload, { authInfo }) => { return { content: [ { type: "text", text: JSON.stringify( { user: authInfo.extra, scopes: authInfo.scopes }, null, 2 ), }, ], }; }) ); // This is a public tool that does not require any scopes server.registerTool( "getDateTime", { title: "Get DateTime", description: "Returns the current UTC date and time", inputSchema: emptyToolInputSchema, annotations: { readOnlyHint: true }, }, async () => { const utcDateTime = new Date().toISOString(); return { content: [ { type: "text", text: utcDateTime, }, ], }; } ); } -
Now we can add the transport route for the MCP server, which implements the core MCP protocol functionality. Create a new file called
route.tsin theapp/[transport]directory.Ts/** * MCP Protocol Handler with Auth0 Authentication * * This Next.js route handler implements the core Model Context Protocol (MCP) server * functionality with Auth0 JWT token authentication. It serves as the main entry point * for MCP clients to communicate with our server and invoke registered tools. */ import { McpServer } from "@modelcontextprotocol/sdk/server/mcp.js"; import { createMcpHandler, withMcpAuth } from "mcp-handler"; import auth0Mcp from "../../lib/auth0-mcp"; import { registerTools } from "../api/chat/mcp-tools"; const initializeServer = async (server: McpServer) => { registerTools(server); }; const handler = createMcpHandler( initializeServer, { // MCP Server configuration options serverInfo: { name: "Example Nextjs MCP Server", version: "1.0.0", }, }, { // Handler configuration options redisUrl: process.env.REDIS_URL, } ); // Wrap the mcp handler with Auth0 authentication middleware // This ensures all requests are authenticated before reaching the MCP handler const authHandler = withMcpAuth( handler, async (_req, token) => { if (!token) { return; } return auth0Mcp.verify(token); }, { required: true, } ); export { authHandler as GET, authHandler as POST };💁 Note: this route will also wrap the mcp handler with our Auth0 authentication middleware.
-
Lastly, let's consume our MCP server tools from our AI agent client so we can use them in our chat application. Our agent can discover and invoke these MCP tools alongside the existing local agent tools. The MCP server is also secured with a JWT (Bearer) access token. Update
app/api/chat/route.tswith the following:Tsimport { openai } from "@ai-sdk/openai"; import { streamText, UIMessage, convertToModelMessages, stepCountIs } from "ai"; import { agentTools } from "./tools"; import { auth0 } from "@/lib/auth0"; import { experimental_createMCPClient } from "ai"; import { MCP_SERVER_URL } from "../../../lib/config"; // Allow streaming responses up to 30 seconds export const maxDuration = 30; async function getAccessToken() { const tokenResult = await auth0.getAccessToken(); if (!tokenResult?.token) { throw new Error("Error retrieving access token for MCP server."); } return tokenResult.token; } export async function POST(req: Request) { const session = await auth0.getSession(); const user = session?.user; const accessToken = await getAccessToken(); console.log("Attempting to connect to MCP"); const mcpServer = await experimental_createMCPClient({ transport: { type: "sse", url: `${MCP_SERVER_URL}/sse`, headers: { Authorization: `Bearer ${accessToken}`, }, }, name: "mcp-server", }); console.log("Trying to load tools from MCP"); const tools = await mcpServer.tools(); console.log("Loaded tools from MCP"); const { messages }: { messages: UIMessage[] } = await req.json(); const result = streamText({ model: openai("gpt-4o"), messages: convertToModelMessages(messages), system: `You are a helpful stock trading assistant for DemoTradePro. You provide trading advice, market insights, and help users understand stock market concepts. You are knowledgeable, professional, and always emphasize risk management. You are currently assisting ${user?.name || "a user"} (${user?.email || "authenticated user"}). Key guidelines: - Always remind users that trading involves risk @@ -34,7 +61,10 @@ Key guidelines: - You can reference the user by their name when appropriate You now have access to real-time stock market data through your tools. Use them when users ask about stock prices, company information, or want to search for stocks.`, tools: { ...agentTools, ...tools, }, stopWhen: stepCountIs(15), }); return result.toUIMessageStreamResponse(); }
Test your MCP Server
-
Start your Next.js app with the MCP server (you may want to restart it if it's already running, and re-login to the app to ensure you have a fresh session):
Bashpnpm dev
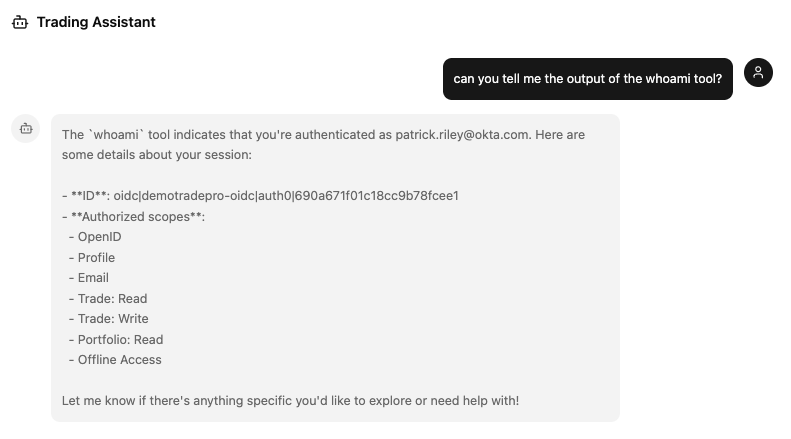
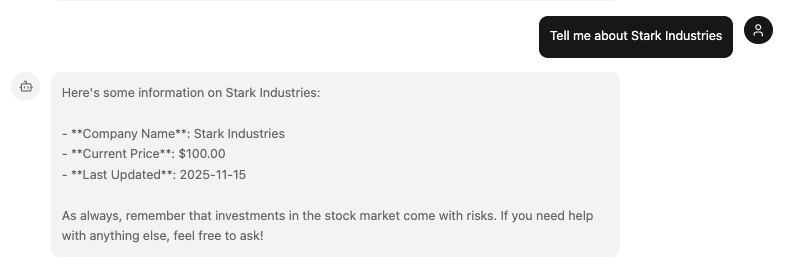
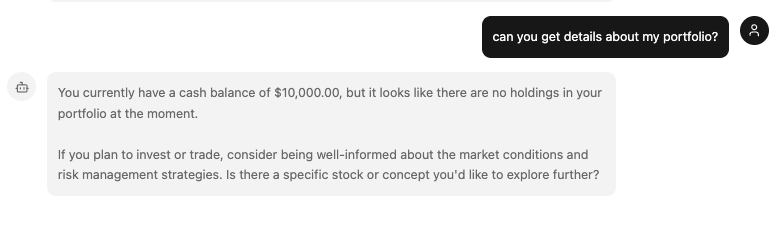
Now open your browser and navigate to http://localhost:3003 and begin chatting with the agent! You can try asking it for stock information, your portfolio information, or even just use the greet and whoami tools to verify your authentication status.
Additional Info about Token Exchange & Token Vault 🔦
By now, you may be wondering more about the token exchange that has occurred, and how you were able to call the DemoTradePro Stock API securely from the MCP server. This is all made possible by Auth0's support for the OAuth 2.0 Token Exchange specification (RFC 8693).
When first logging into the app, the application requests the Enterprise OIDC connection on your tenant, which is connected to the upstream Identity Provider (the Root DemoTradePro Tenant in this case) for authentication. However, the access token returned from Auth0 at this stage is scoped only for the MCP server itself, and cannot be used to call the DemoTradePro Stock API directly.
{
  "iss": "https://genai-1461924127169898.us.auth0.com/",
  "sub": "oidc|demotradepro-oidc|auth0|690a671f01c18cc9b78fcee1",
  "aud": [
    "http://localhost:3003/mcp",
    "https://genai-1461924127169898.us.auth0.com/userinfo"
  ],
  "iat": 1763234288,
  "exp": 1763320688,
  "scope": "openid profile email trade:read trade:write portfolio:read offline_access",
  "azp": "ajUIbbY7J21nkg6EidUUj0o6UXgQAF0n"
}
When the MCP server receives a request from the agent which requires a DemoTradePro Stock API call with the user's access token, it can request a token exchange using Auth0's Token Vault to obtain a new access token issued and scoped for the DemoTradePro Stock API (given the user has consented access previously to the necessary API scopes requested for this connection).
The MCP server makes a token exchange request to Auth0's Token Vault, passing in the user's access token for the MCP server as the subject_token, and specifying the demotradepro-oidc as the upstream connection for the new token. Auth0 validates the request, and if everything checks out, it issues a new access token scoped for the DemoTradePro Stock API.
{
  "iss": "https://shrek-workshop-stock.us.auth0.com/",
  "sub": "auth0|690a671f01c18cc9b78fcee1",
  "aud": [
    "https://api.stocktrade.example",
    "https://shrek-workshop-stock.us.auth0.com/userinfo"
  ],
  "iat": 1763238410,
  "exp": 1763324810,
  "scope": "openid profile email portfolio:read trade:write trade:read offline_access",
  "azp": "xXnMFnJJOh8sQtcakKZPZxyRsLY2wTMB"
}
TokenVault will securely store and intelligently manage the access token from that point forward. When the token expires based on the expiration set by the external provider, TokenVault will automatically remove it, ensuring that stale tokens are never used.
TokenVault also handles requesting additional token scopes from the upstream provider (after user consent) when necessary, and refreshing expired tokens as needed, so your MCP server can always get a valid token when calling downstream APIs.
Due to the functionality that TokenVault provides, the MCP Server never needs to handle long-lived user credentials or manage API keys, and can securely call downstream APIs on behalf of the user with short-lived, granularly scoped access tokens. ⭐
Success! You now have an MCP Server! 🚀
Congratulations! You've successfully repackaged your agent tools as MCP tools with the help of Vercel's MCP Handlers, and you have a firm grasp of how to secure your agent and MCP servers.
💸 When can I start trading, though?
Now try asking: "Buy 2 shares of STARK if the price is below $200"
Agent response: "I don't have the ability to place trades directly on your behalf..."
The problem: Your agent knows who you are and how to access your data, but it doesn't know how to place orders on your behalf.
Coming up: We'll show you everything you need to know about ensuring the Right human stays in the loop during all of your agentic workflows. Move on to the Keep Humans in the Loop tab of this workshop when you are ready!