Keep Humans in the Loop
Auth0 Async Auth provides a secure "human-in-the-loop" mechanism that enables AI agents to work autonomously while seeking user consent for sensitive or critical actions only when necessary.
Built on the Client-Initiated Backchannel Authentication (CIBA) standard and enhanced with
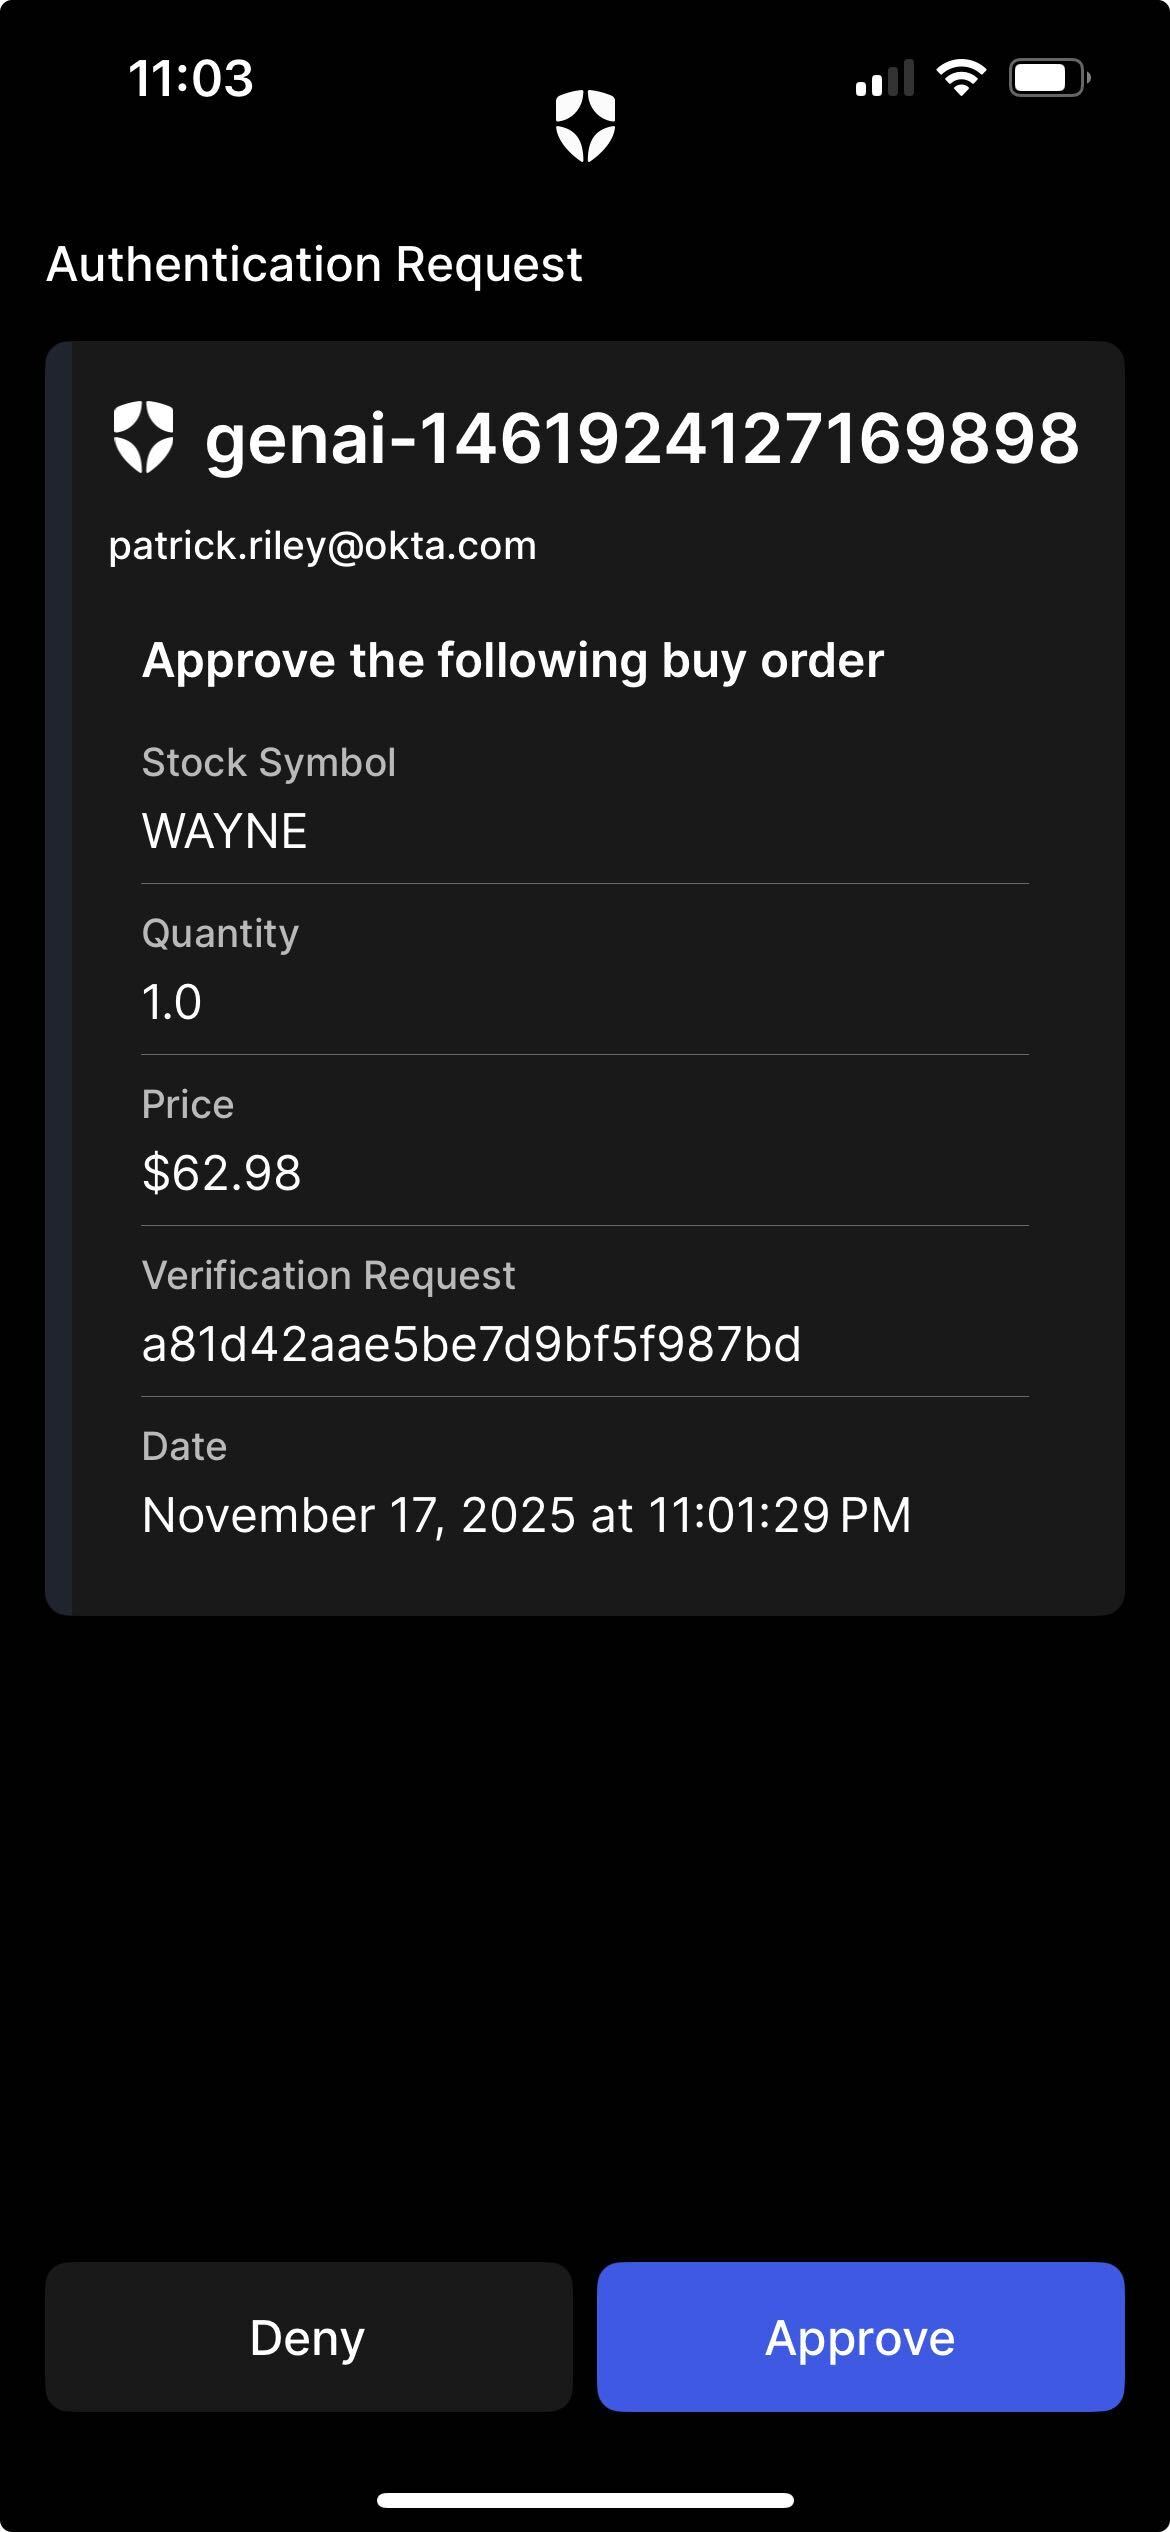
Rich Authorization Requests (RAR), this authentication flow allows an AI agent's backend to initiate an authorization request without direct user interaction on the same device. Instead, an authorized user receives a notification (via push, SMS, or email) on a separate trusted authentication device, such as their mobile phone, where they can review detailed context about the requested action—like "Approve payment of $50.00 to ExampleCorp"—and approve or deny it at their convenience.
This approach is ideal for scenarios like transactional approvals, accessing sensitive data, or executing high-privilege tasks, where the agent needs delayed user approval while maintaining security and transparency through rich, verifiable context that builds user trust.
What we're building in this step
Async Auth Setup
Prerequsities:
- You'll need Auth0 Guardian app when using push notifications to verify the agent's transactions in this step
- You can install in the
Apple App Store or
Google Play Store
- You can install in the
- Under Security -> Multi-factor Auth ensure you have enabled Push Notifications using Auth0 Guardian

- After enabling Push Notifications, you'll want to enroll your user for CIBA. Here's one of easy way of achieving that:
- Navigate to User Management -> Users and select your oidc|demotradepro user
- Within the Details tab, scroll down to Multi-Factor Authentication and select Send and enrollment invitation.

- This will email you an MFA enrollment email titled Invitation to enroll in Multifactor Authentication. Find the email and hit the Enroll in Mutlifactor Authentication button.
- This will provided you a QR code which you can scan on your mobile device and use to enroll your user for push notifications with Auth0 Guardian
Updating our solution for Asynchronous Authorization
- Let's first add additional helper function (
getTokenByBackchannelAuth) tolib/auth0.tsfor asynchronously receiving the authorization token using our existing Agent client. Append this function to the existing file:
import { AuthorizationDetails } from "@auth0/nextjs-auth0/types";

export async function getTokenByBackchannelAuth({
  bindingMessage,
  authorizationDetails,
}: {
  bindingMessage: string;
  authorizationDetails?: AuthorizationDetails[];
}) {
  const session = await auth0.getSession();
  if (!session) {
    return undefined;
  }

  try {
    const token = await auth0.getTokenByBackchannelAuth({
      bindingMessage,
      authorizationDetails,
      loginHint: {
        sub: session.user.sub,
      },
    });
    if (!token.tokenSet) {
      throw new Error("The user didn't authorize the request");
    }
    return token.tokenSet.accessToken;
  } catch (error) {
    console.error("Failed to get token by backchannel auth:", error);
    throw error;
  }
}- Next, let's enhance our Agent tools in
app/api/chat/tools.tsto include theCreateOrdertool. We'll make use of our newgetTokenByBackchannelAuthhelper function, and additionally ensure we provide the rich authorization details with the push notification request:
/**
 * DemoTradePro Agent Tools Configuration
 * Centralized tool definitions for the chat agent
 */

import * as GetStockPrice from "@workspace/agent-utils/tools/get-stock-price";
import * as GetPortfolio from "@workspace/agent-utils/tools/get-portfolio";
import * as CreateOrder from "@workspace/agent-utils/tools/create-order";
import { createAPIClient } from "@workspace/agent-utils";

import { AuthorizationDetails } from "@auth0/nextjs-auth0/types";

import {
  getTokenByBackchannelAuth,
  auth0CustomApiClient,
  getAccessTokenForConnection,
} from "@/lib/auth0";

/**
 * Create shared API clients
 */
const apiClient = createAPIClient(process.env.API_BASE_URL!, async () => {
  const token = await getAccessTokenForConnection({
    connection: process.env.API_OIDC_CONNECTION_NAME!,
  });
  return token;
}); // Token provider for auth

/**
 * Create a client which relies on async auth prior to token exchange execution
 */
const apiClientWithAsyncAuth = createAPIClient(
  process.env.API_BASE_URL!,
  async ({ authParams }) => {
    if (authParams && authParams.bindingMessage) {
      const asyncAuthToken = await getTokenByBackchannelAuth({
        bindingMessage: authParams.bindingMessage,
        authorizationDetails:
          authParams.authorizationDetails as AuthorizationDetails[],
      });

      /**
       * Exchange the async auth token for a federated access token in the Token Vault
       * Note: for simplicity, we use the existing Custom API Client in Auth0 linked
       * with the MCP Server API to logically represent the Stock API client used by
       * the Agent & the MCP Server. However, you could create a separate API / API Client
       * to model with the Agent alone to provide more fine-grained controls.
       */
      const token = await auth0CustomApiClient.getAccessTokenForConnection({
        connection: process.env.API_OIDC_CONNECTION_NAME!,
        accessToken: asyncAuthToken!,
      });

      if (!token.accessToken) {
        throw new Error("Access token is not available in Auth0 Token Vault");
      }

      return token.accessToken;
    }
    return undefined;
  }
);

/**
 * Public stock market tools - no authentication required
 */
export const publicStockTools = {
  getStockPrice: GetStockPrice.createAISDKTool(apiClient),
} as const;

/**
 * Authenticated tools - require user session and API access
 */
export const authenticatedTools = {
  getPortfolio: GetPortfolio.createAISDKTool(apiClient),
  createOrder: CreateOrder.createAISDKTool(apiClientWithAsyncAuth),
} as const;

/**
 * All available tools for the agent
 * Includes both public and authenticated tools
 */
export const agentTools = {
  ...publicStockTools,
  ...authenticatedTools,
} as const;- Finally, lets enhance the system prompt in
api/chat/route.tsto first announce to the user that they will need to verify a push notification sent to their phone before an order can be created. Update thesystemparam with the following:
  const result = streamText({
    model: openai("gpt-4o"),
    messages: convertToModelMessages(messages),
    system: `You are a helpful stock trading assistant for DemoTradePro. You provide trading advice, market insights, and help users understand stock market concepts. You are knowledgeable, professional, and always emphasize risk management.

You are currently assisting ${user?.name || "a user"} (${user?.email || "authenticated user"}).

Key guidelines:
- Always remind users that trading involves risk
- When placing BUY or SELL orders, announce to the user that a notification will be sent to their phone and ask for their acknowledgement before proceeding
- Provide educational information about stocks and markets
- Help with basic trading concepts and strategies
- Be conversational and helpful
- Never provide specific financial advice or guarantees
- You can reference the user by their name when appropriate

You now have access to real-time stock market data through your tools. Use them when users ask about stock prices, company information, or want to search for stocks.`,
    tools: {
      ...agentTools,
      ...tools,
    },
    stopWhen: stepCountIs(15),
  });
Let's test it out!
Pull up your application again, and try some prompts like the ones below.
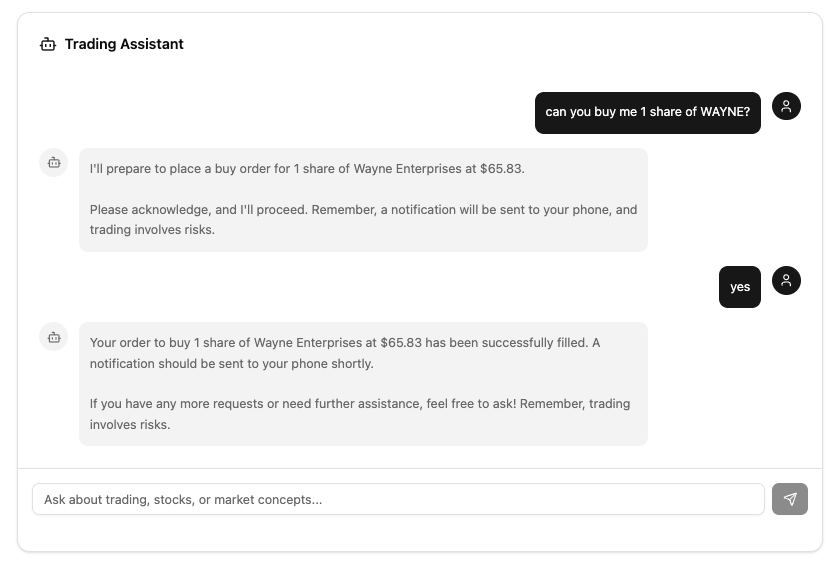
You should get a notification asking you to verify the order to buy or sell your shares (and a confirmation message like the one above once you have approved in Guardian and the order has filled).
Amazing, you're an Asynchronous Auth wizard now!
I hope you enjoyed this section as much as we did, and you're truly appreciating the power of CIBA!
Now it's time to take the next step and deploy your Vercel application for production use, enabling seamless adoption with other MCP-capable clients and AI agents. Check out the next section on deploying to Vercel, validating Dynamic Client Registration (DCR) with MCP inspector, and integrating with native AI tools like ClaudeCode.
We'll also cover more advanced topics like how to configure ChatGPT Apps to connect to your MCP server using the new ChatGPT App SDK.
Select the Bonus: AI-native Tools section when you are ready to turn it up to eleven! 🎵 🎸