AI-native Tools Integration
In this section, we'll show you how to integrate your MCP Server with popular Native AI Tooling platforms like ChatGPT App SDK and
Claude Code, enabling your users' seamless access to your MCP server tools directly from their AI-native environments.
💡 Note: This is advanced bonus material for this workshop, so feel free to skip it if you're short on time ⏰. This is provided as additional material for those looking to deepen their understanding of AI-native integrations, and the setup can be more involved.
After we deploy your new MCP Handlers to Vercel, you'll have transcended your simple AI chat agent into an AI-native platform, ready for integration with the broader AI ecosystem. 💪
These AI-native clients can also make use of DCR (Dynamic Client Registration) to onboard securely with your tenant at Auth0 and access our fictitious DemoTraderPro Stock API.
Here's an expanded flow diagram with DCR included for the AI-native tools mentioned:
Deployment to Vercel
A few of the prequisties with Vercel are:
- You have a Vercel account (free tier is fine). You can sign up here at
vercel.com/signup.
- You'll need to have a Redis provider which Vercel can connect to from the MCP Handlers since we'll no longer be using Docker locally. I chose to use
- You'll want to fork your current
demo-trade-pro repository to your own GitHub org which you can import, modify if needed, and deploy to Vercel.
💡 Note: If you're not interested in deploying to Vercel, you can skip ahead to the Validating in MCP Inspector section and still validate DCR works with your localhost MCP server we created before.
1. Procure a Redis database (e.g., Upstash)
- Go to
- Follow the prompts to create a new Upstash Redis database. There will be a few screens with some region and tier selection options.
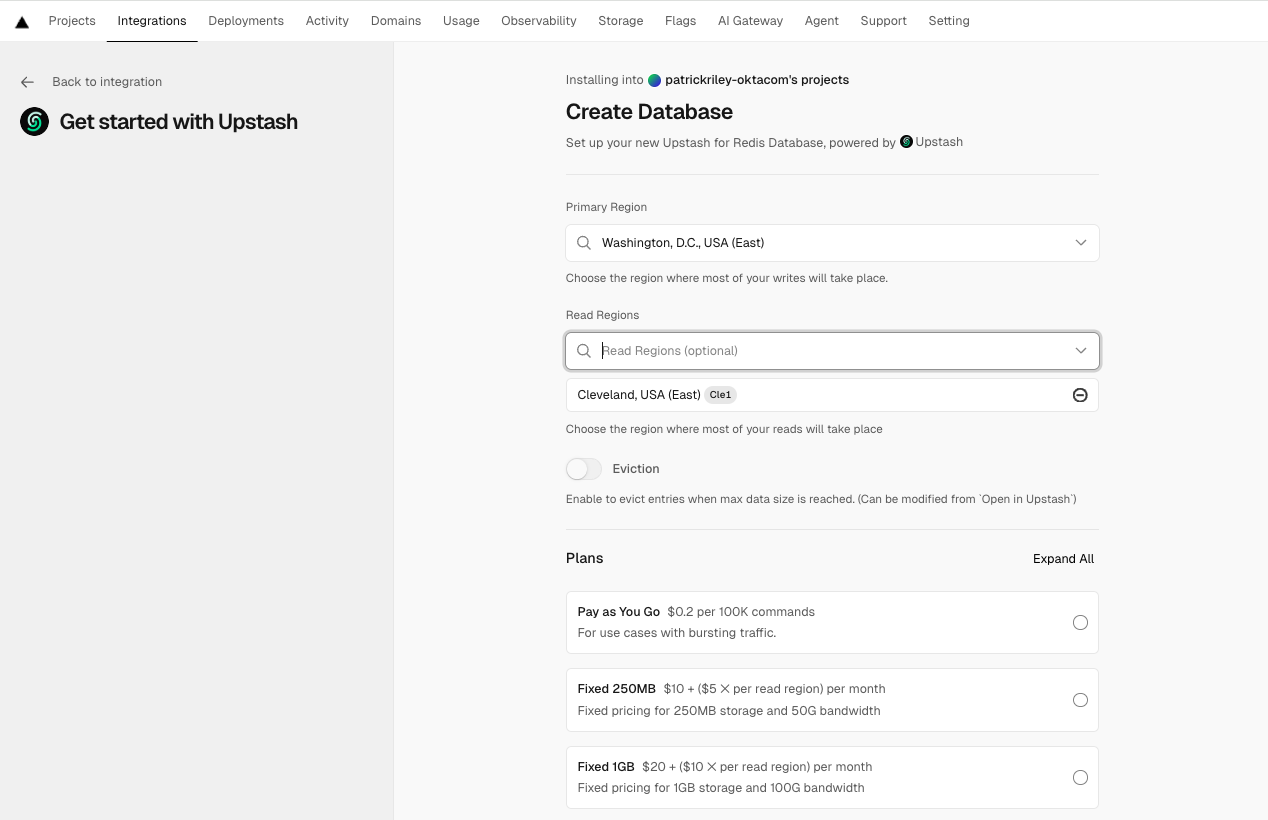
Once created, note down the REDIS_URL, KV_URL, KV_REST_API_URL, KV_REST_API_TOKEN, and KV_REST_API_READ_ONLY_TOKEN from the Upstash dashboard. You'll need to set these as environment variables in your Vercel project in the next step.
2. Setup a new Vercel project
Head over to Vercel's new project page to quickly import your forked repository and setup a new project. Vercel will automatically detect the Next.js framework and set the build settings correctly for you.
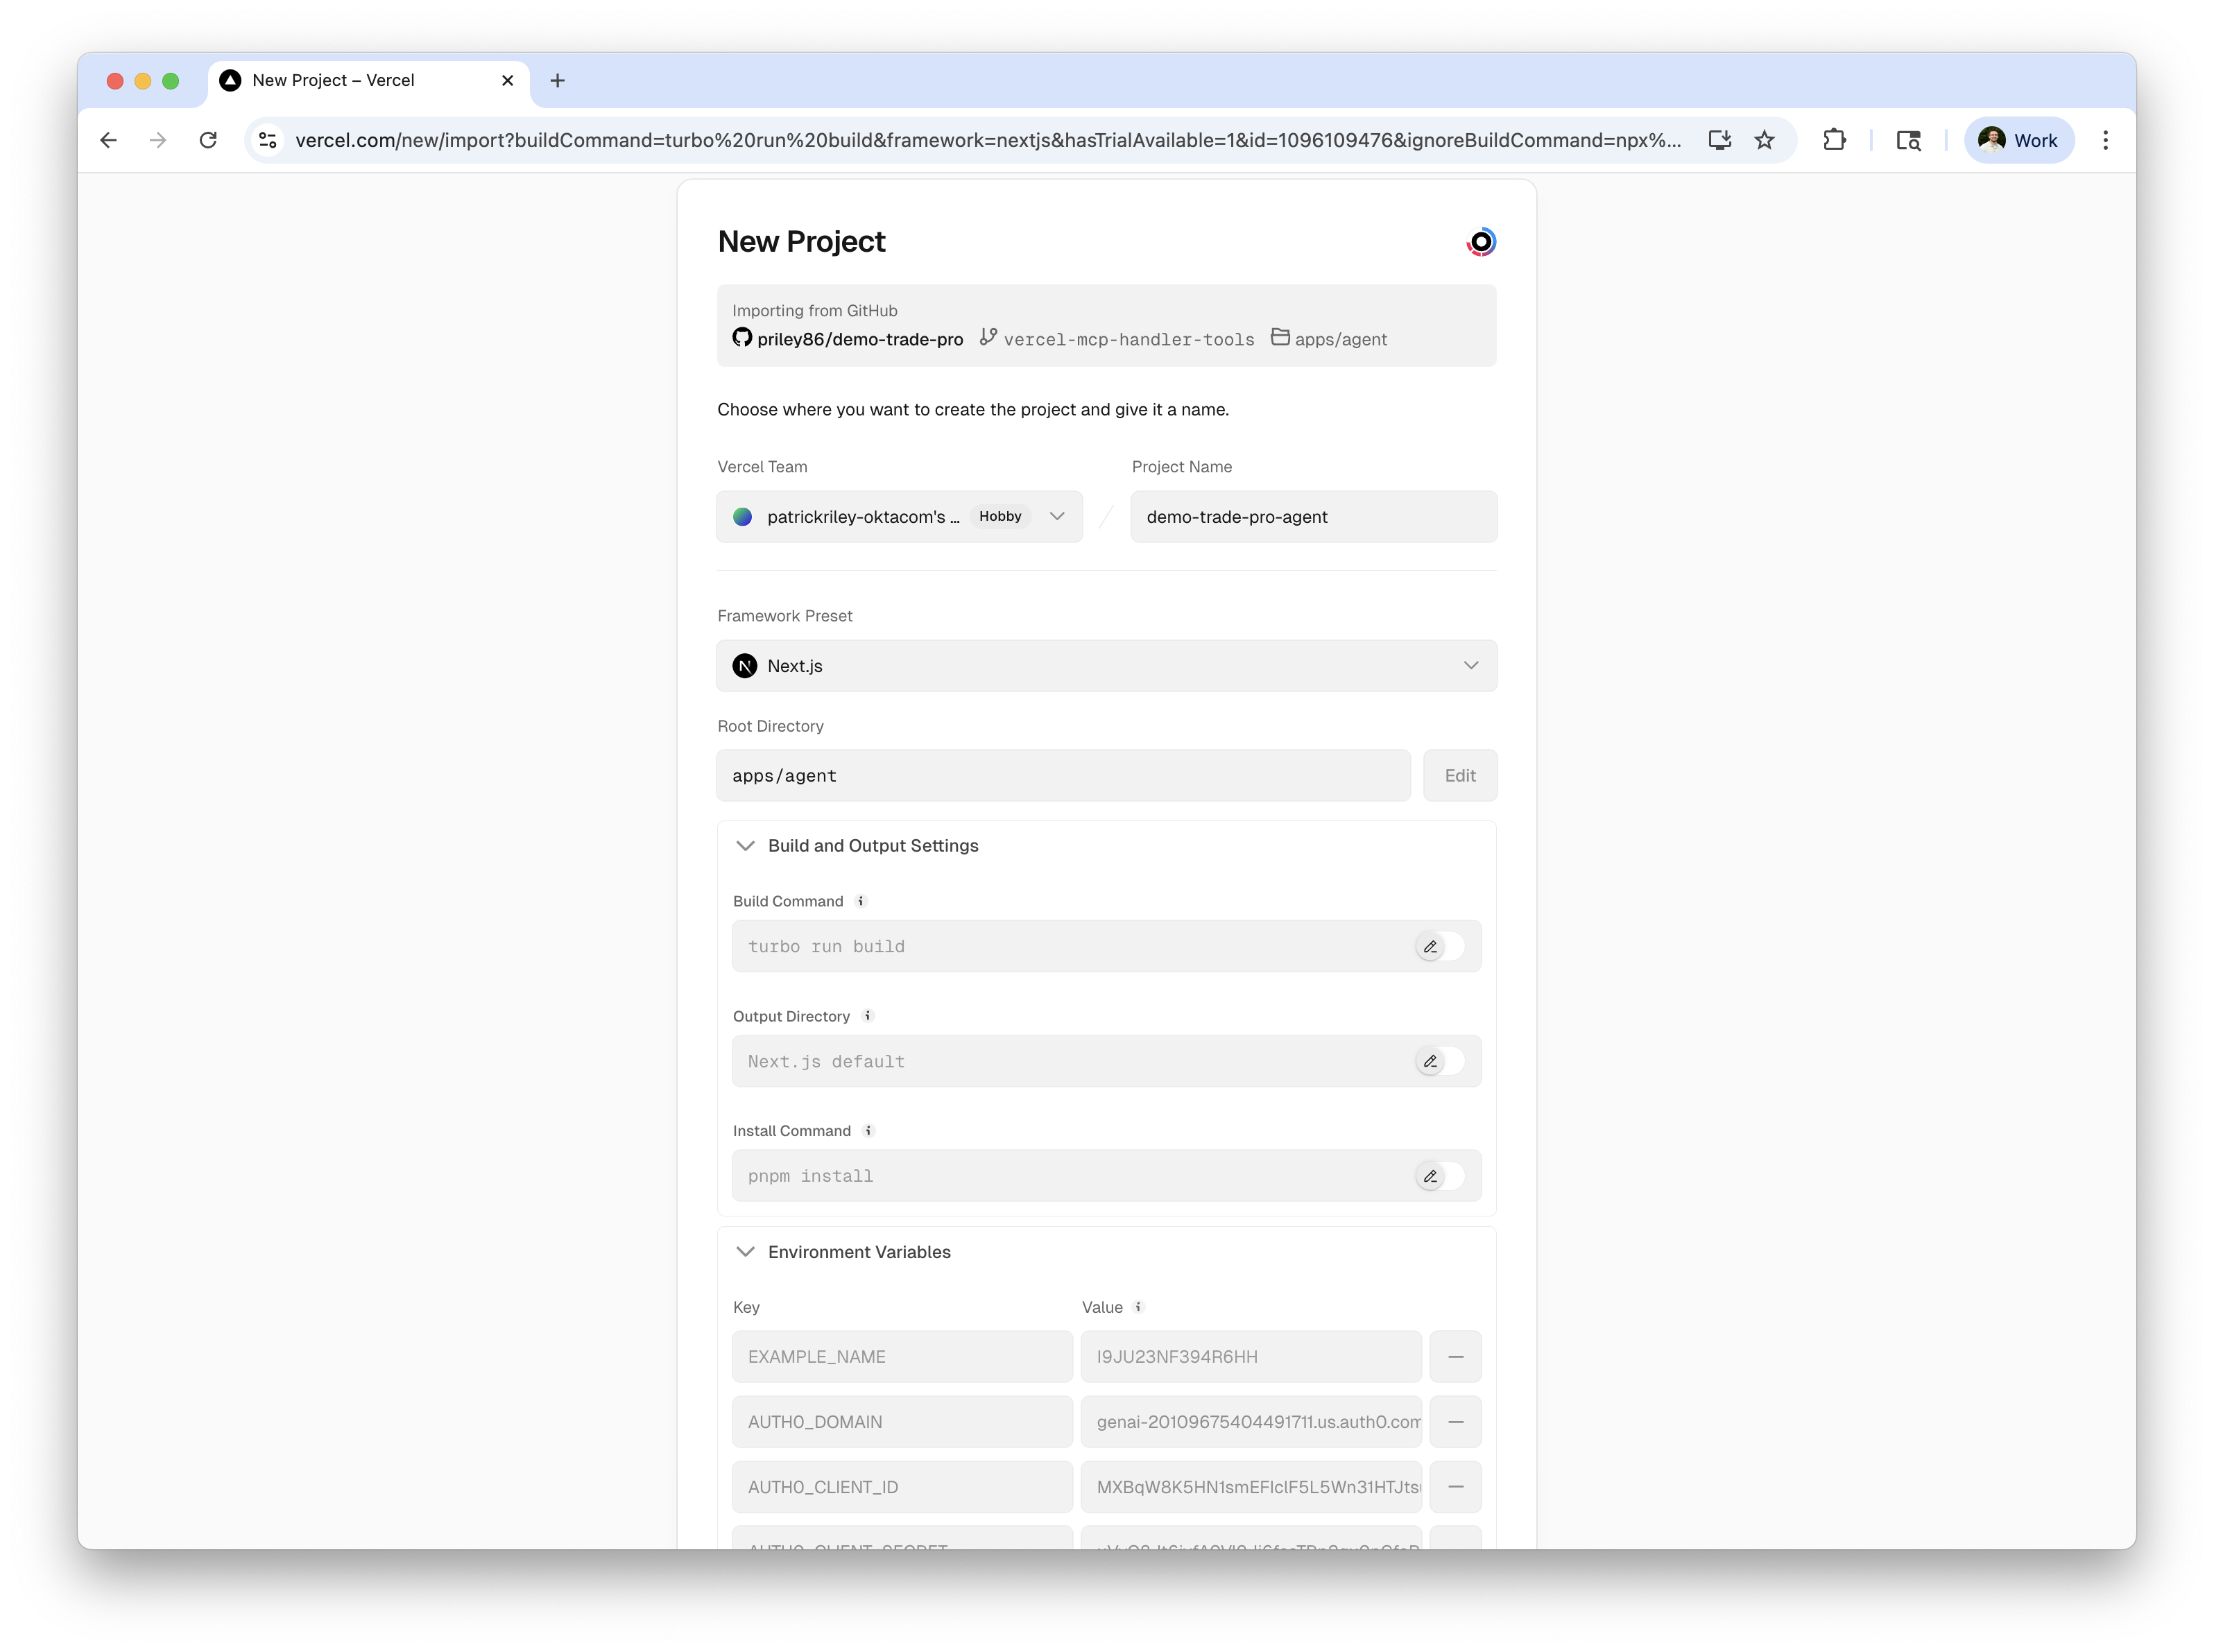
Now, as far as environment variables go, you'll need to set the same ones you have in your local .env file, plus the new Redis-related ones from Upstash.
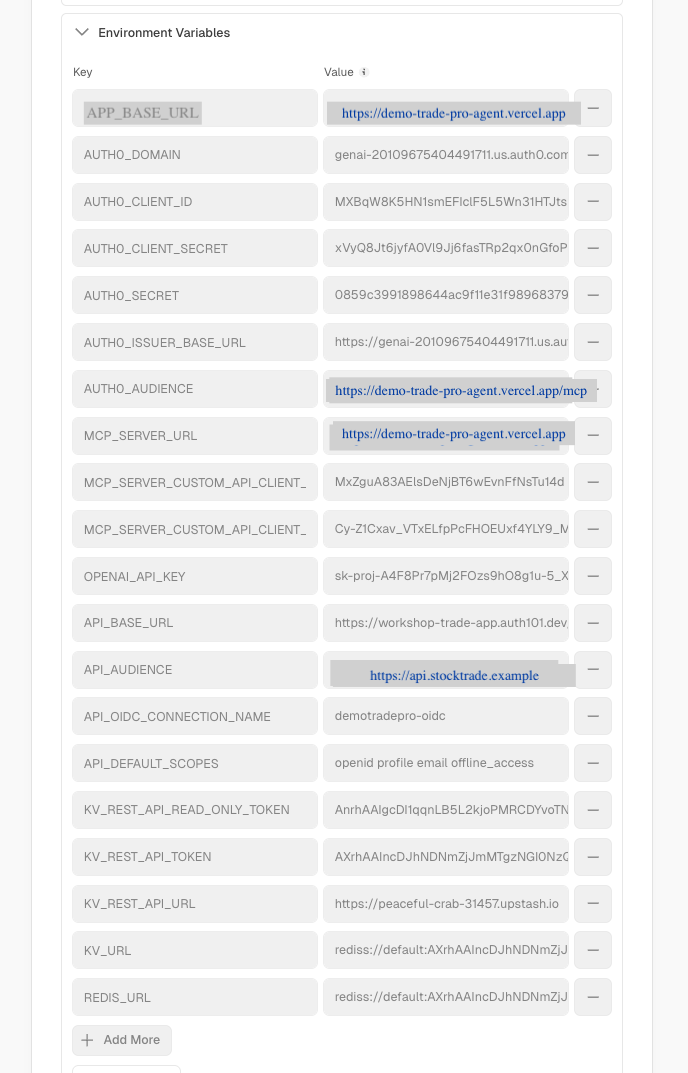
⚠️ Important note: you'll need to set the APP_BASE_URL, and MCP_SERVER_URL based on your new Vercel deployment URL (or custom domain), e.g., https://demo-trade-pro-agent.vercel.app.
⚠️ Also important: you'll need to set the AUTH0_AUDIENCE to the API Identifer you used when creating the StockTrade MCP Server API in Auth0. This is critical for token validation to work correctly. As you'll see later in the ChatGPT App SDK section, some providers will actually request this as the resource (audience) based on the MCP Server URL you provide and not allow you to specify it when authorizing with Auth0, so I recommend making this match your MCP resource URL exactly, e.g., https://demo-trade-pro-agent.vercel.app/mcp. This will require you to create an additional API in your Auth0 tenant with this exact identifier with matching settings to your existing StockTrade MCP Server.
An alternative (and recommended) path here is rerunning the auth0-agent/init.sh script provided for setting up your tenant after changing your AGENT_BASE_URL setting in the auth0-agent/config.sh provided. e.g.:
# update auth0-agent/config.sh with your new Vercel URL
export AGENT_BASE_URL="https://demo-trade-pro-agent.vercel.app"

# Login to Auth0 CLI using the tenant you wish to use
auth0 login --scopes create:client_grants

# re-run the init script
./auth0-agent/init.shNote: If you plan to run this on the same tenant, it may easiest to delete all of your existing tenant resources (Apps, APIs, OIDC connections) prior so that the terraform scripts start "fresh":
cd auth0-agent/terraform
terraform destroy -auto-approve
rm -f terraform.tfstate terraform.tfstate.backup .terraform.lock.hcl
If you are looking to test this quickly with MCP Inspector and your existing configuration though, your existing http://localhost:3003/mcp identifer (AUTH0_AUDIENCE) will work fine for now. You'll still want to set the APP_BASE_URL and MCP_SERVER_URL appropriately to reflect your new Vercel URL deployment.
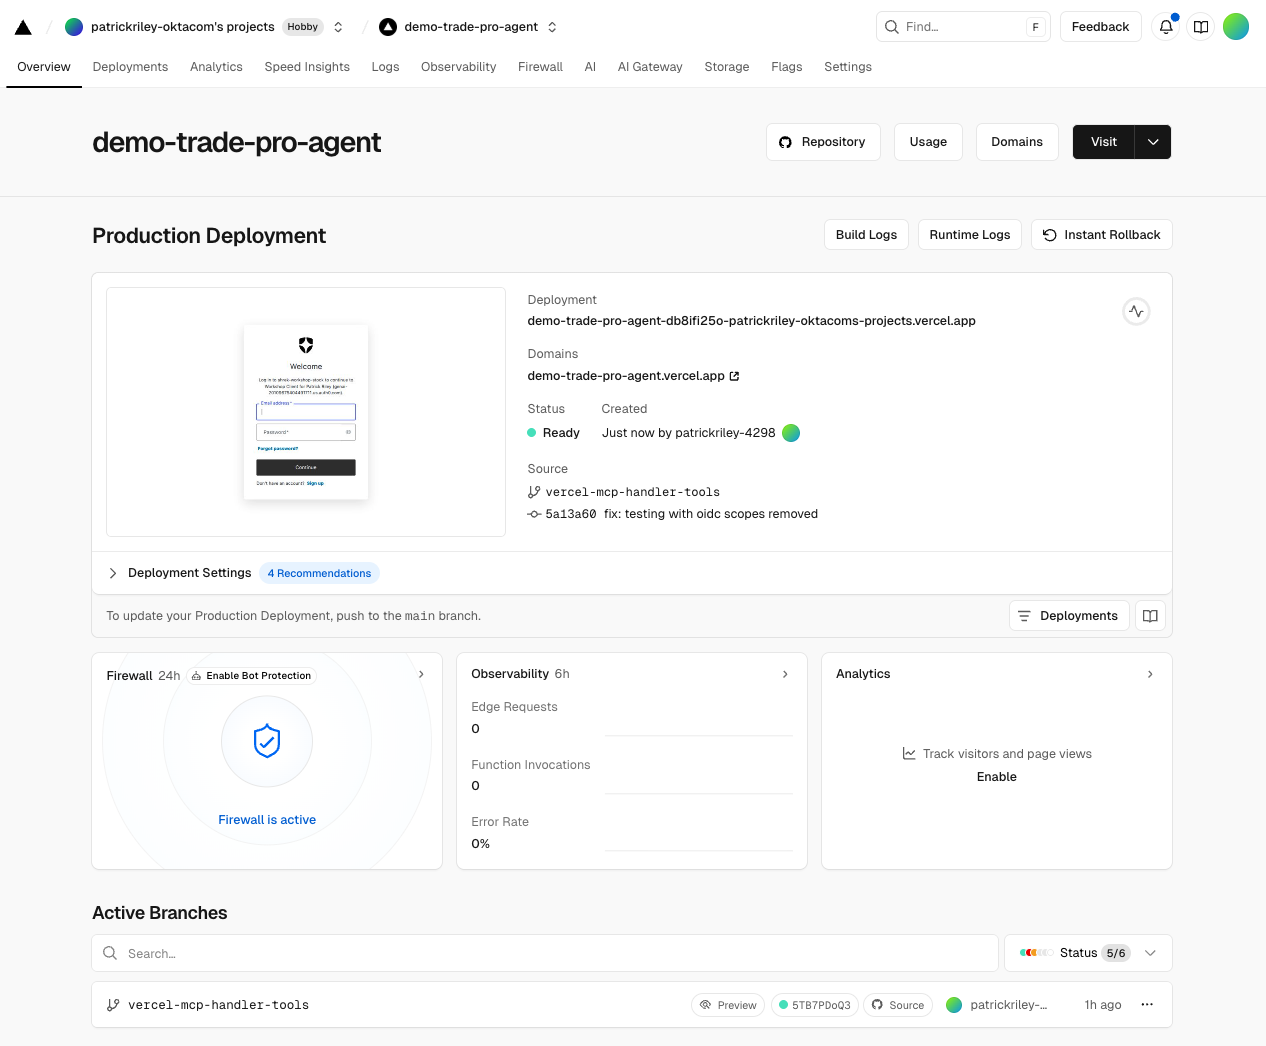
Hit Deploy and wait for your project to build and deploy successfully! With any luck, you should see a successful deployment screen like this after your Next.js project has finished building and deployed:
Validating in MCP Inspector
Validating with MCP Inspector is quite easy once you have your MCP Server running or it has been deployed to Vercel. It also provides a conventional, easy way to validate the entire OAuth DCR flow with Auth0. ♥️
Simply run in a new terminal window to get started:
$ npx @modelcontextprotocol/inspector
Starting MCP inspector...
⚙️ Proxy server listening on localhost:6277
🔑 Session token: e9a436f85a5d92caa44eb4614b43f4409ab26cecbeca3ad9065fed03619d315b
   Use this token to authenticate requests or set DANGEROUSLY_OMIT_AUTH=true to disable auth

🚀 MCP Inspector is up and running at:
   http://localhost:6274/?MCP_PROXY_AUTH_TOKEN=e9a436f85a5d92caa44eb4614b43f4409ab26cecbeca3ad9065fed03619d315b

🌐 Opening browser...
This will open a new browser window to the MCP Inspector interface.
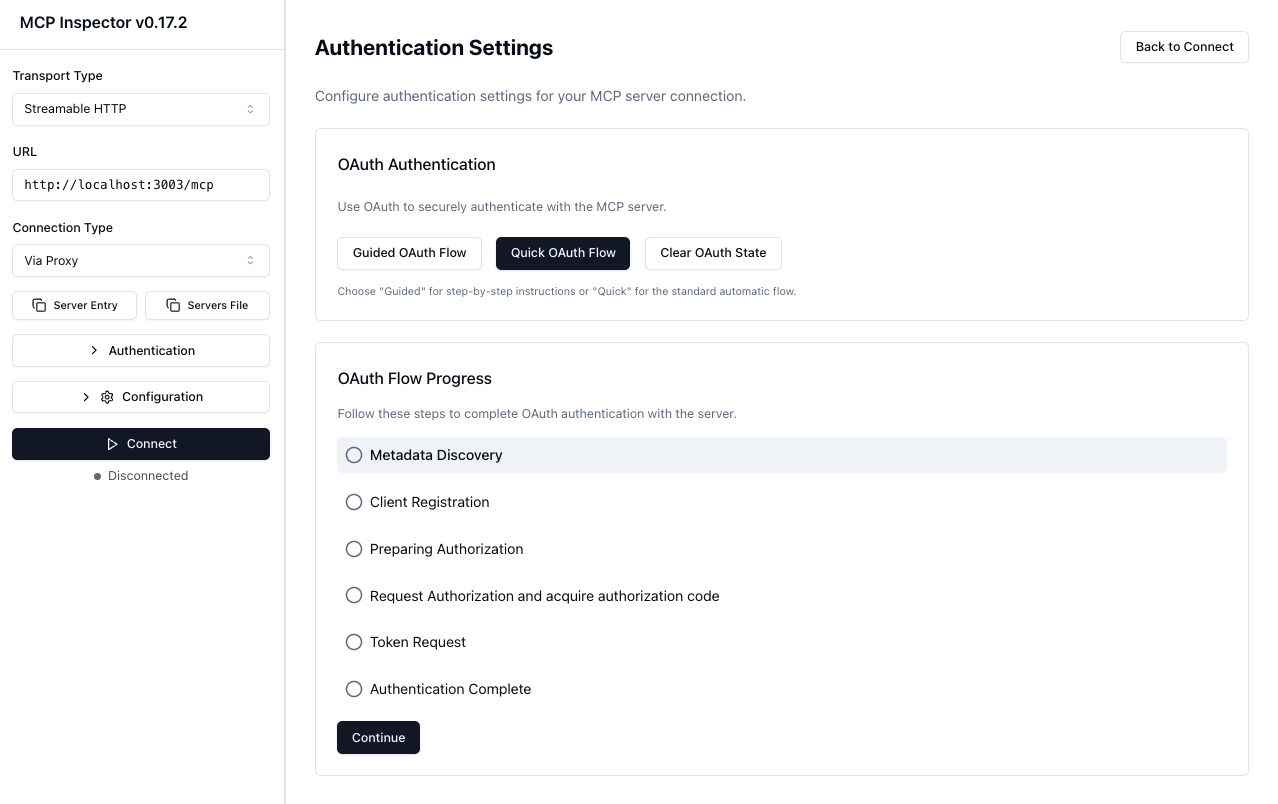
From here, you can enter your MCP Server URL (e.g., http://localhost:3003/mcp or your Vercel URL), and start making requests to validate your MCP Server functionality, including DCR with Auth0.
- Enter your MCP Server URL in the URL field and select Streamable HTTP as the Transport Type.
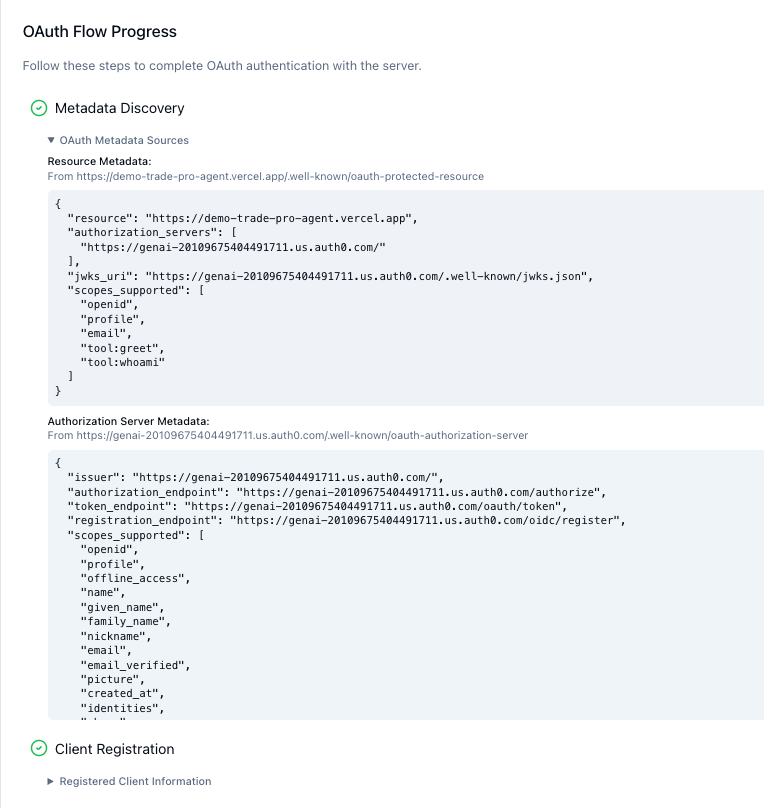
- Click Open Auth Settings and begin walking thru the OAuth flow, either using the Quick OAuth Flow button or stepping thru each step of the flow using the OAuth Flow Progress section and the Continue button below.
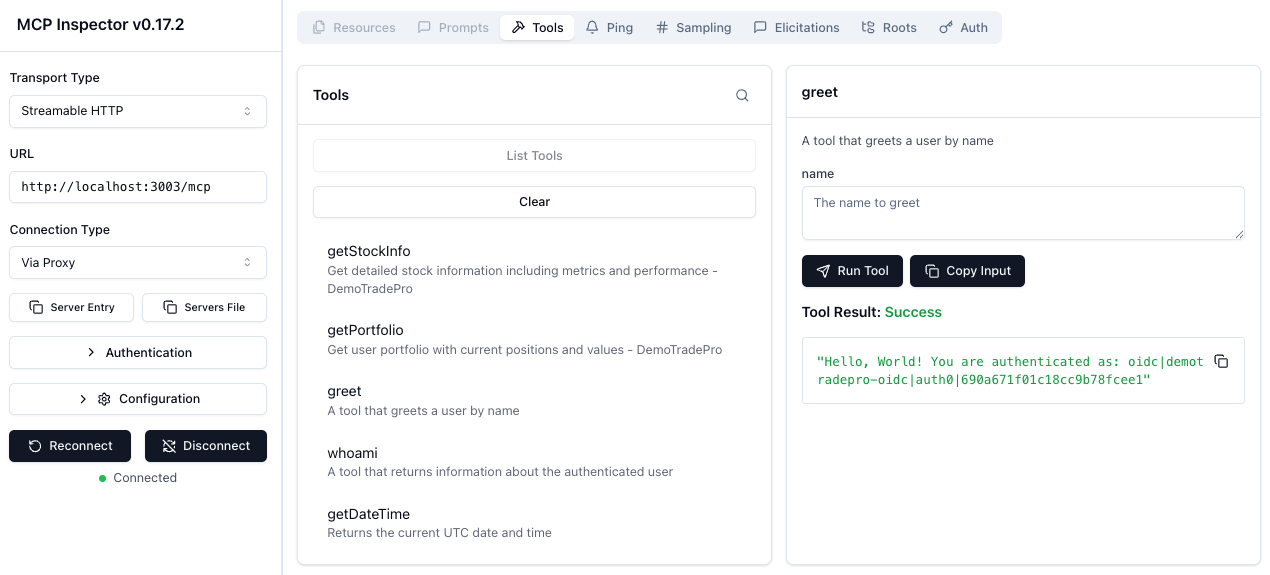
- Once authenticated, you can see the list of available tools, and start making MCP requests to your server to see the responses.
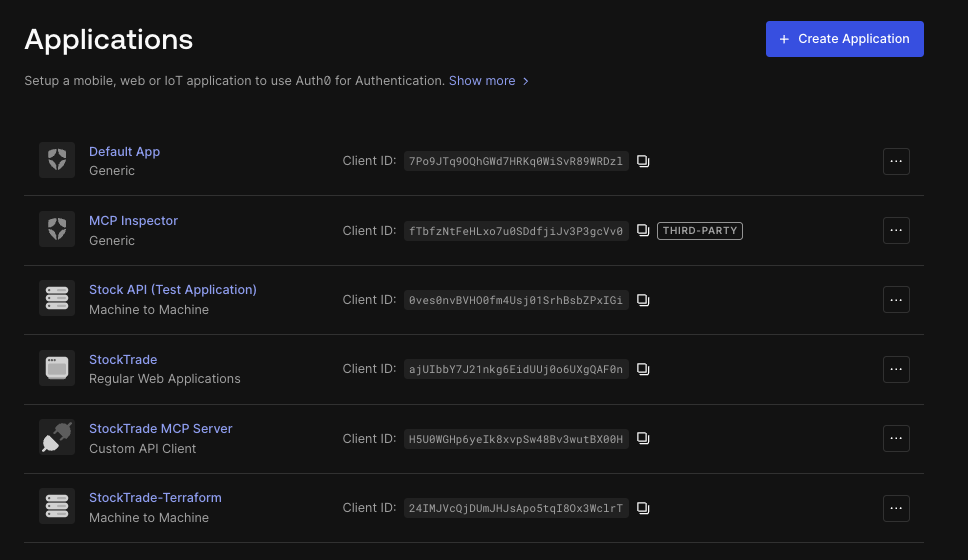
You should also see the new application has been registered in your Auth0 tenant as a Third-Party application if you used DCR successfully!
ChatGPT App SDK & ChatGPT Connector Integration
As of this writing, you'll need a few prerequisites to get started with ChatGPT App SDK integration:
- A ChatGPT Plus or Pro individual account, Business, or Enterprise account. See
ChatGPT pricing plans for more details.
- You'll need to enable
Developer Mode in your ChatGPT settings.
- Your MCP Server will need to be publicly accessible over HTTPS (e.g., via Vercel) since ChatGPT needs to reach it over the internet. Depending on your network, you may also be able to get away with using a localhost tunneling solution like
ngrok for testing purposes, but a proper public URL is recommended. See the documentation
Connect from ChatGPT documentation for more details.
After you've enabled Developer Mode in your ChatGPT settings, you can create a new ChatGPT App Connector under your ChatGPT settings. Hit the Create button to get started:
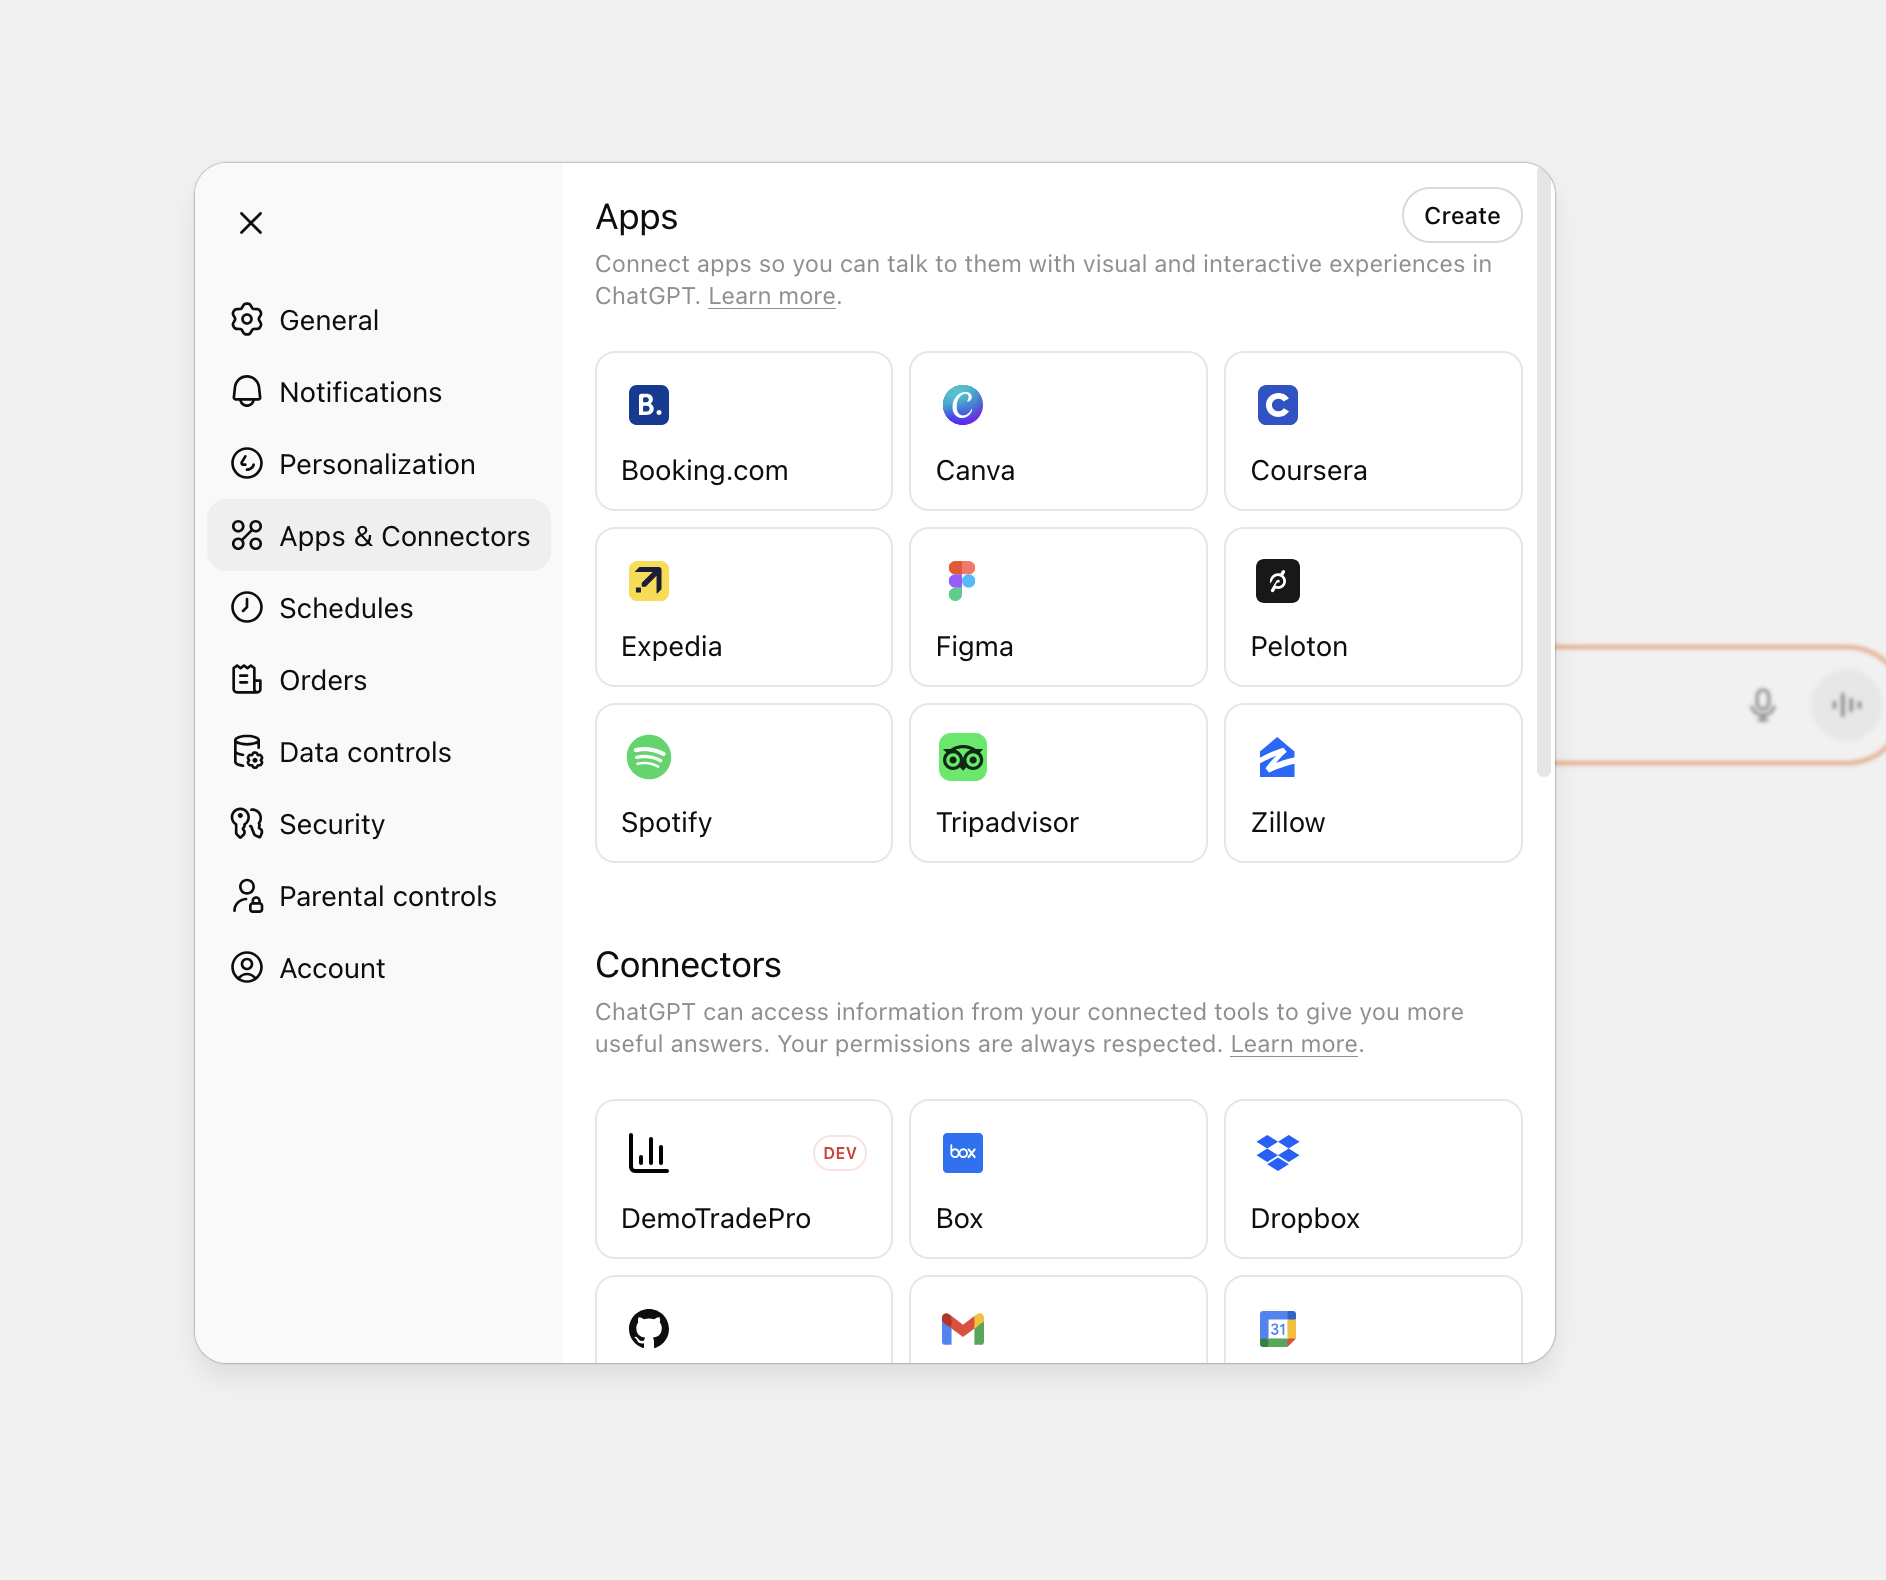
Next, you'll need to fill out the App Connector form with the following details (specifying your MCP Server URL):

After creation, hit the Connect to [YOUR APP] button to finalize the connector setup and authorize your MCP server connection.
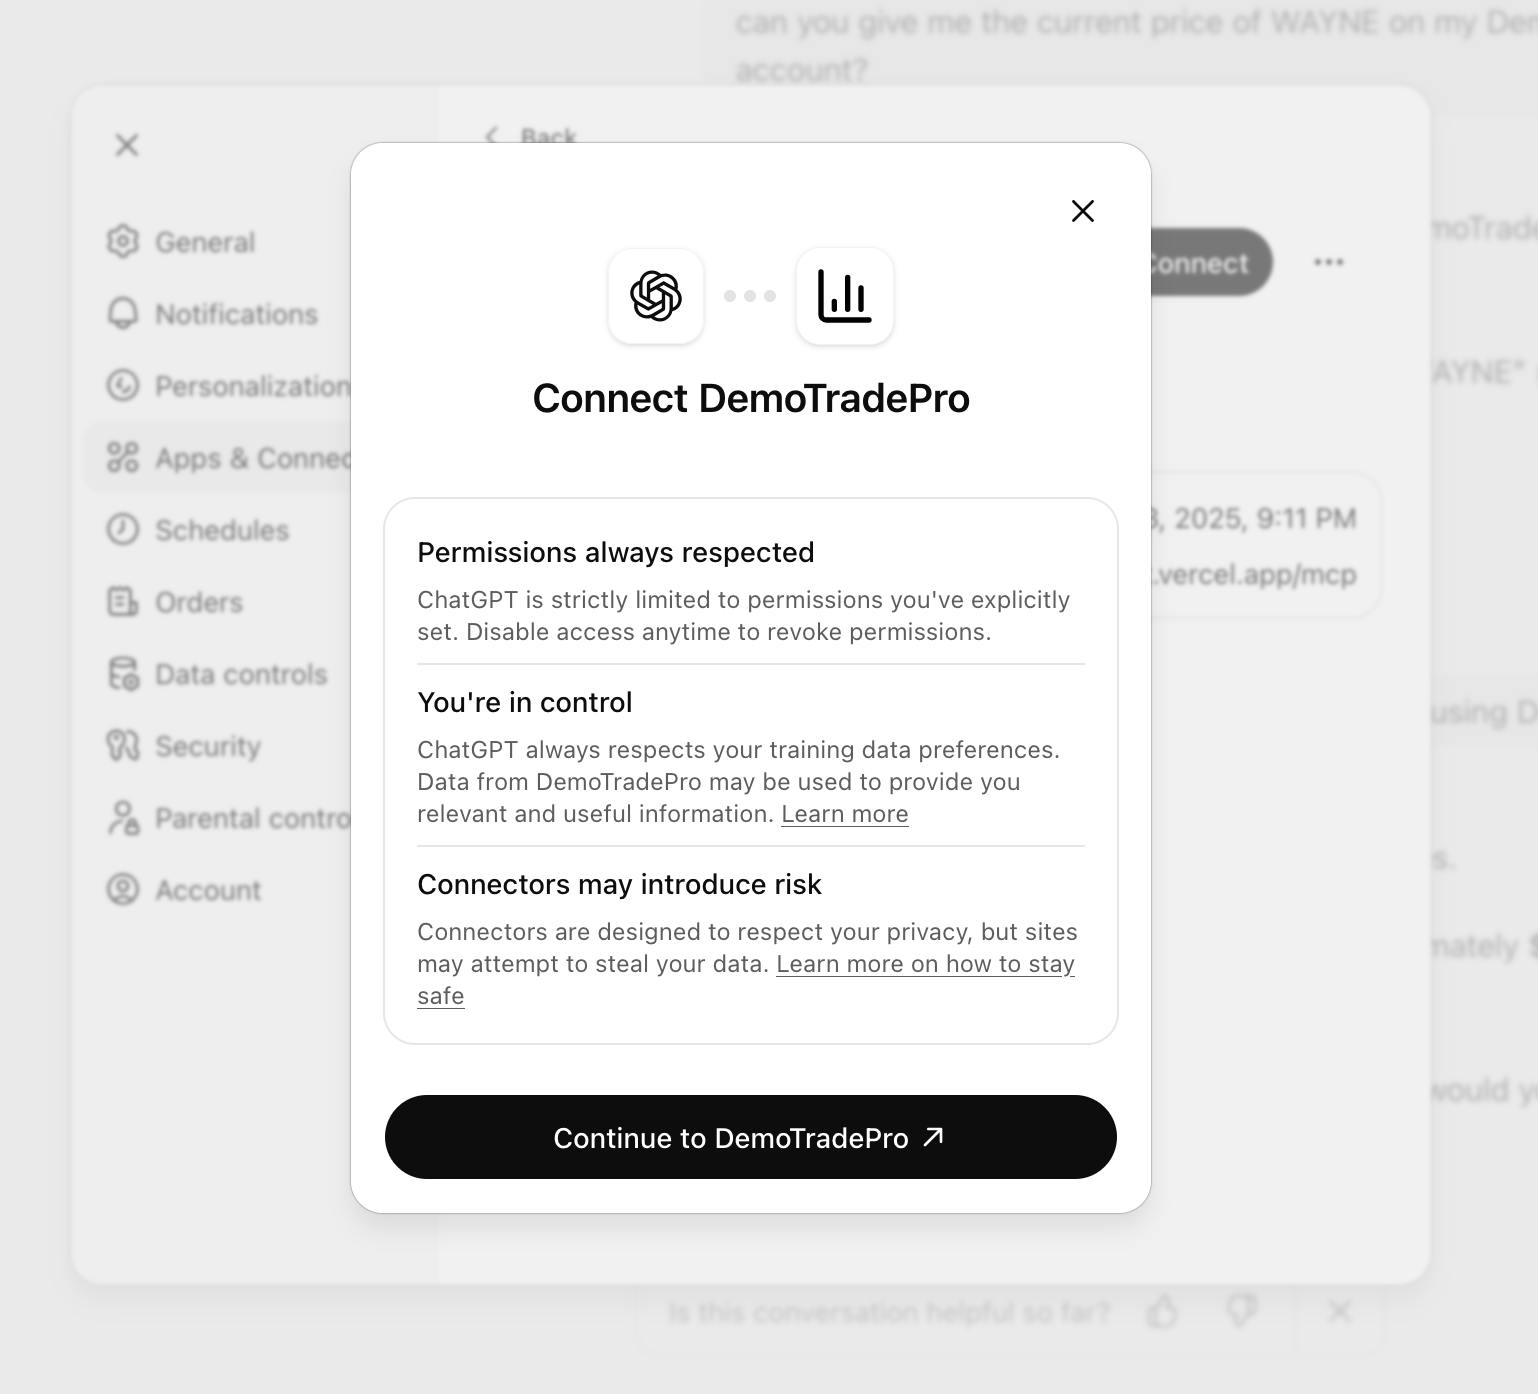
Now you should see you an Auth0 consent screen, asking you to authorize the ChatGPT App Connector to access your MCP Server resources on your behalf. This is where the OAuth DCR flow we implemented earlier comes into play. The resource is set to your MCP Server URL, and the connector uses DCR to register itself dynamically with your Auth0 tenant.
⚠️ Important: Also note that the scopes requested here at the time of this writing will mimic the scopes_supported (and declared in your MCP Server's .well-known/oauth-protected-resource endpoint). So ensure that your MCP Server is declaring the correct scopes your tools require for proper operation. At the time of this writing, you should also not need to request the common openid, profile, and email etc. scopes, and you should only request the scopes actually used by your MCP tools.
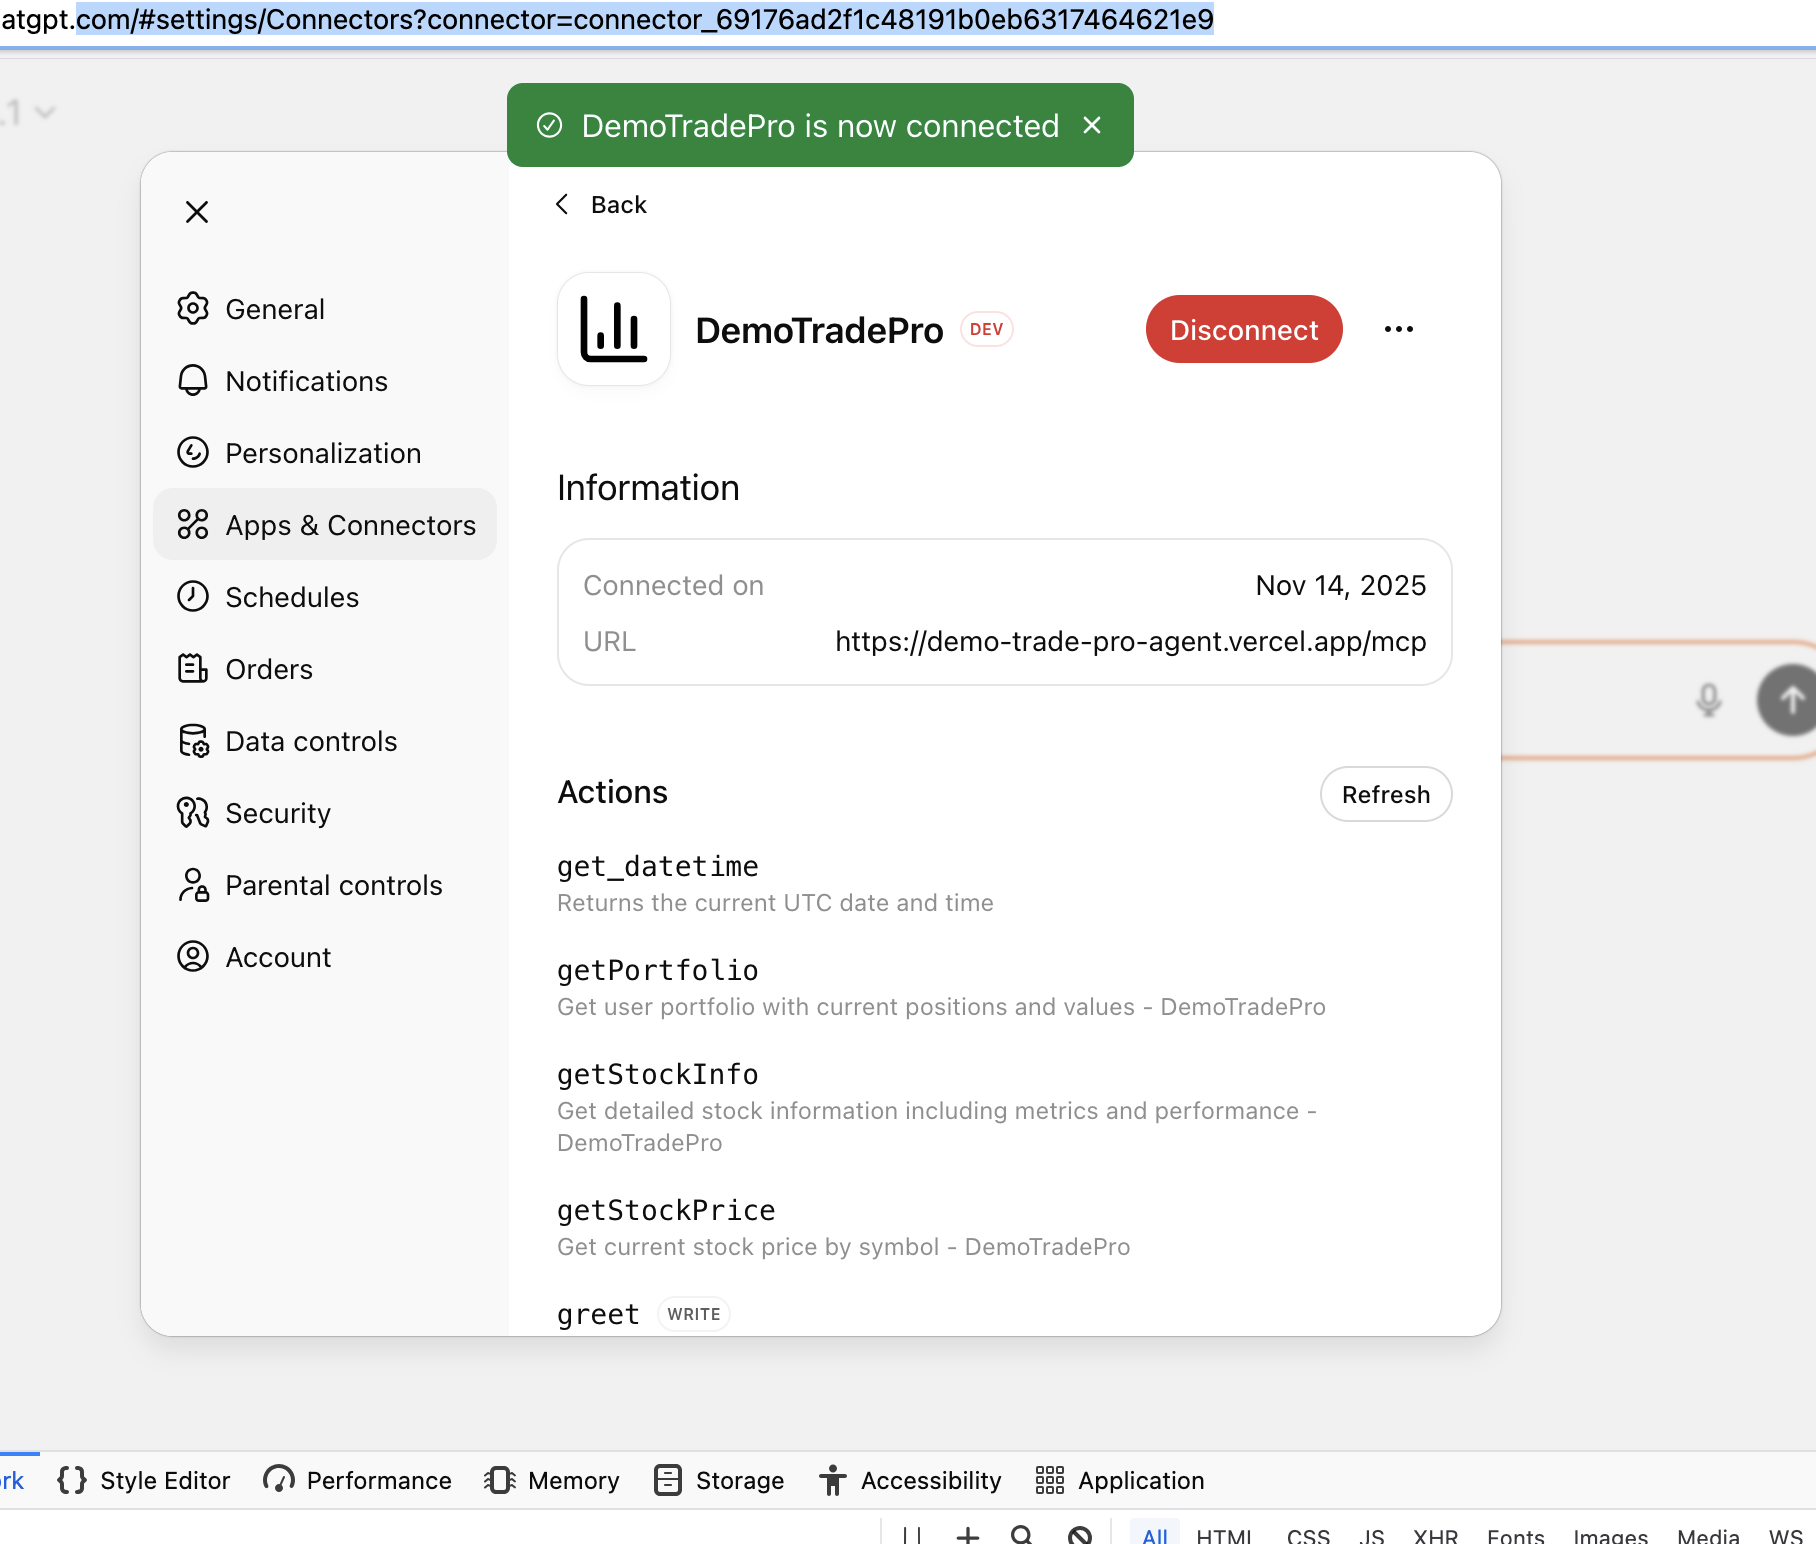
With any luck, you should now be connected!
You can now start a new ChatGPT conversation and invoke your MCP Server tools directly from ChatGPT using natural language prompts:
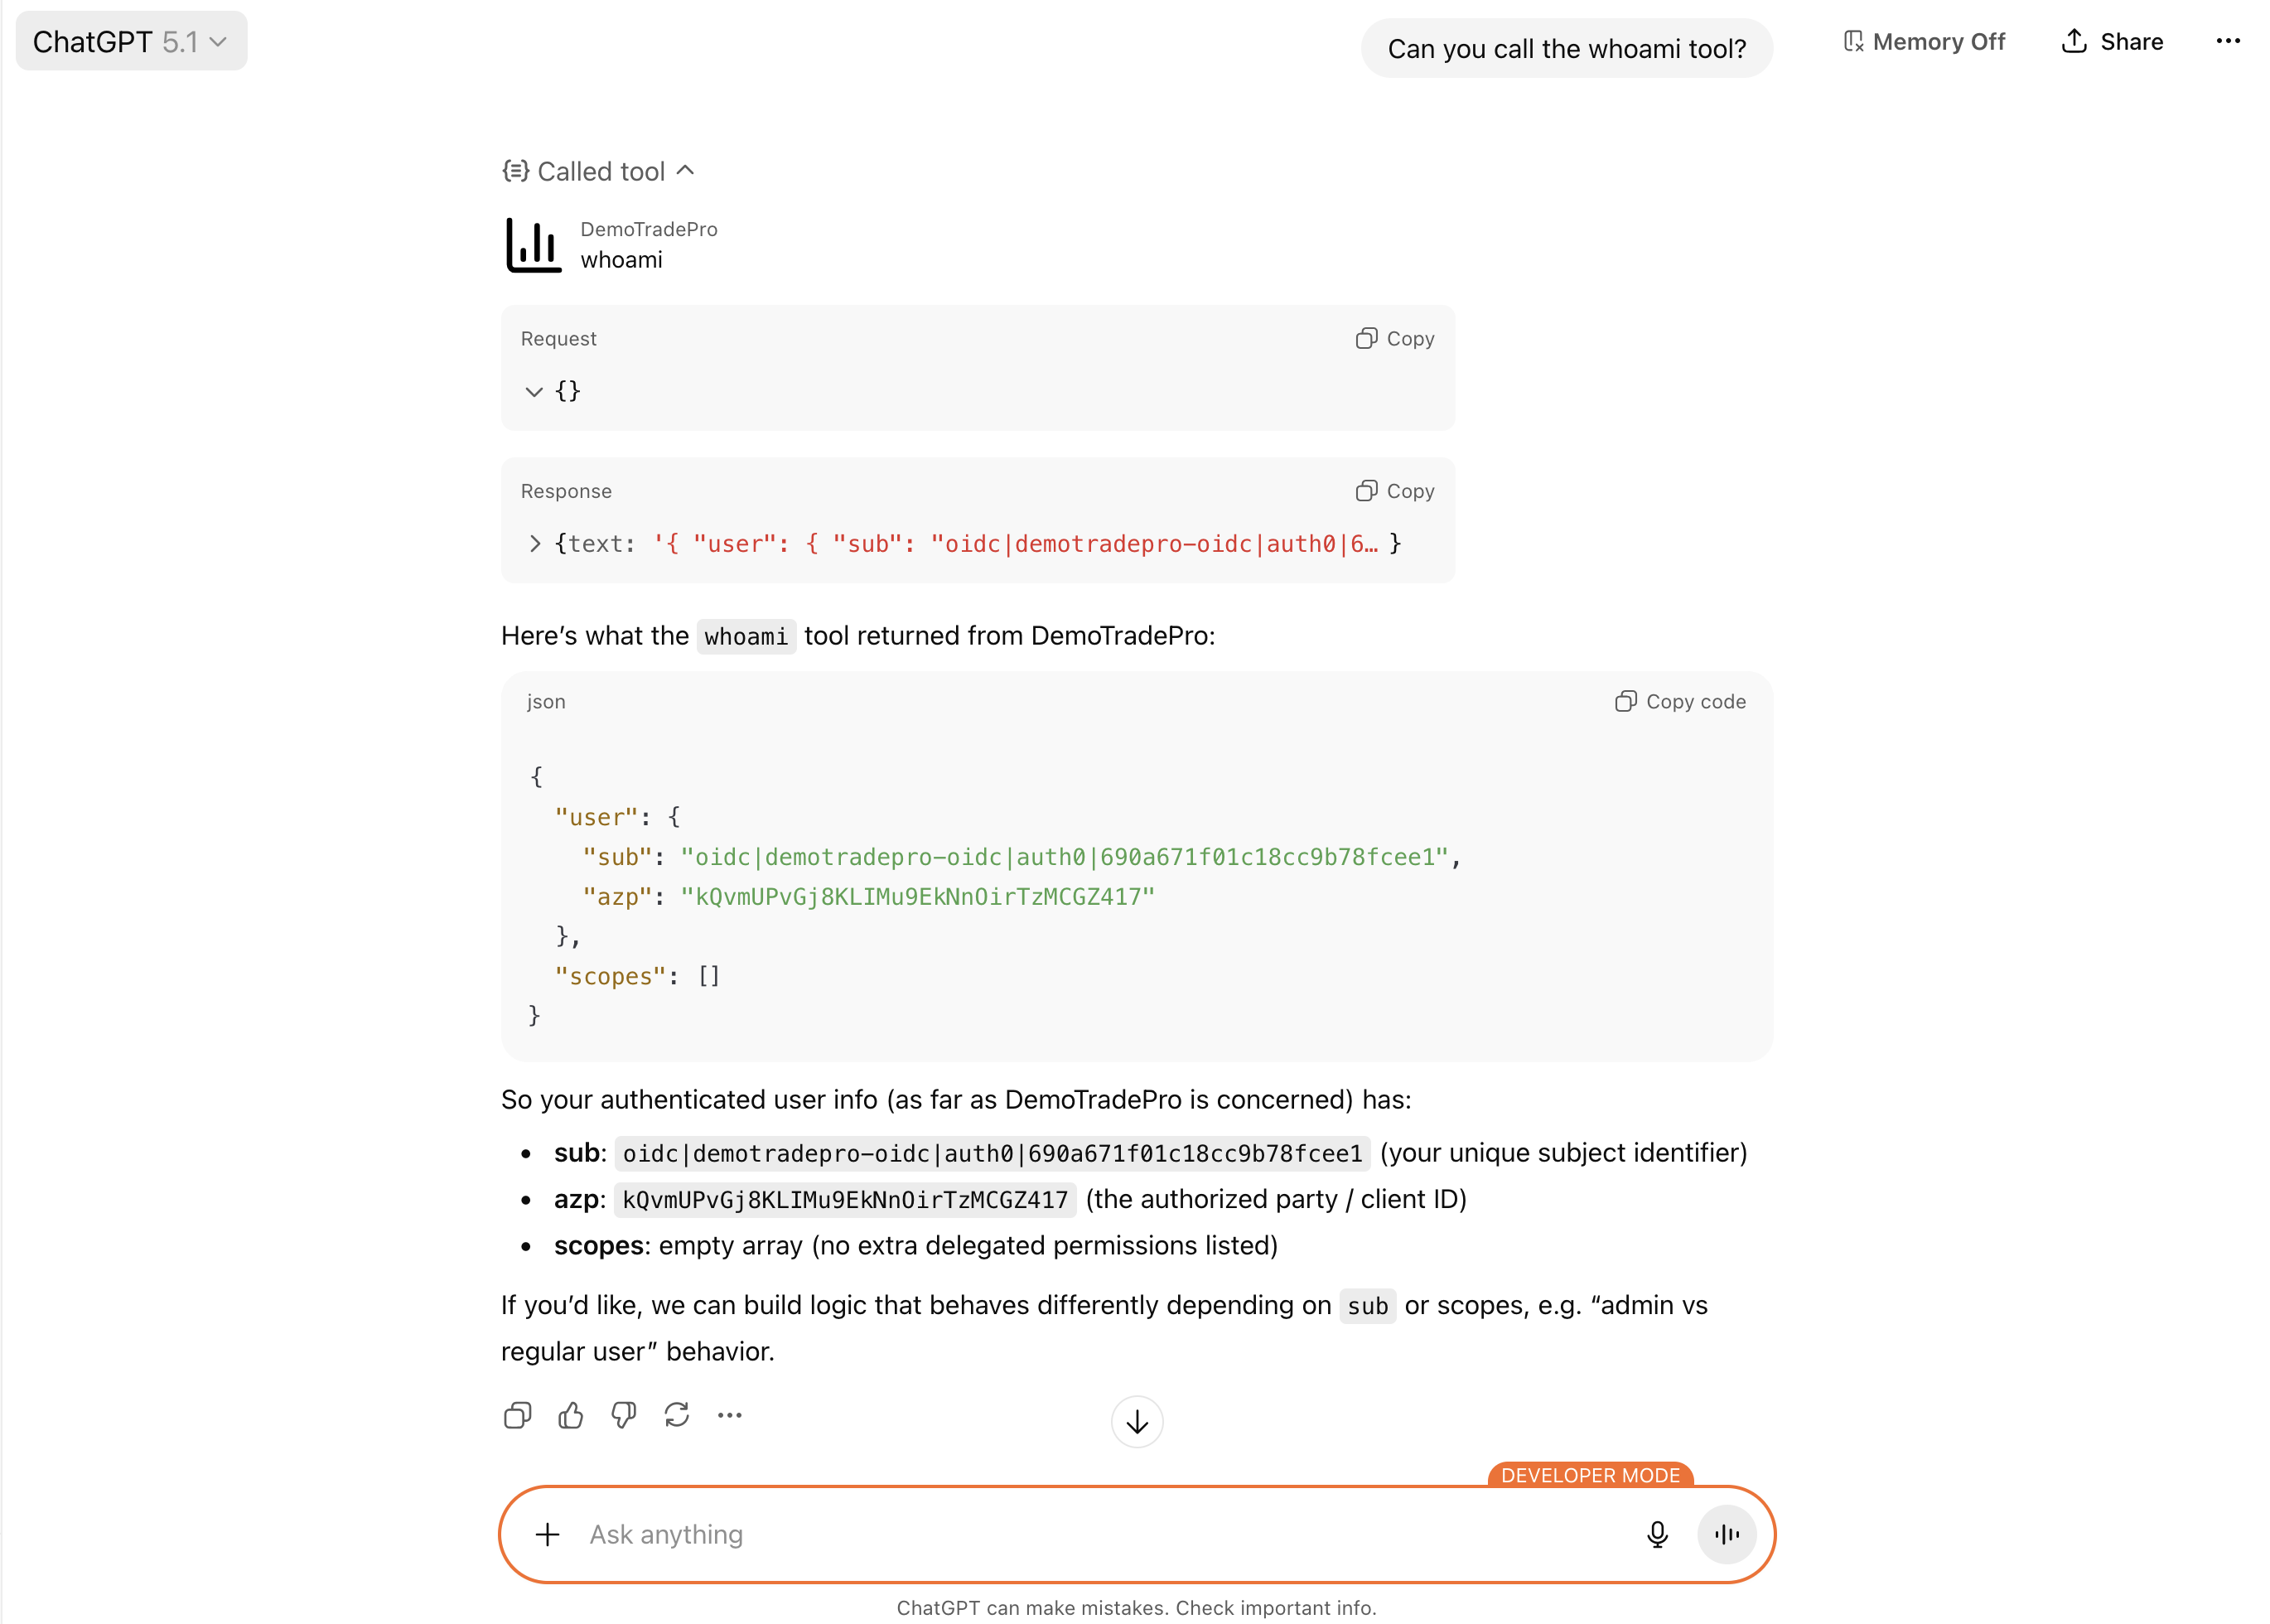
🔍 Troubleshooting ChatGPT App SDK Integration
This is a very new feature set from OpenAI and I encourage you to make use of the following when troubleshooting:
- Always inspect your API server logs (MCP Handlers) to see incoming requests and any errors that may have occured.
- Use the Auth0 Dashboard to monitor the OAuth flows and see any errors that may occur during the DCR process. Visit the Monitoring -> Logs view to see your tenant logs.
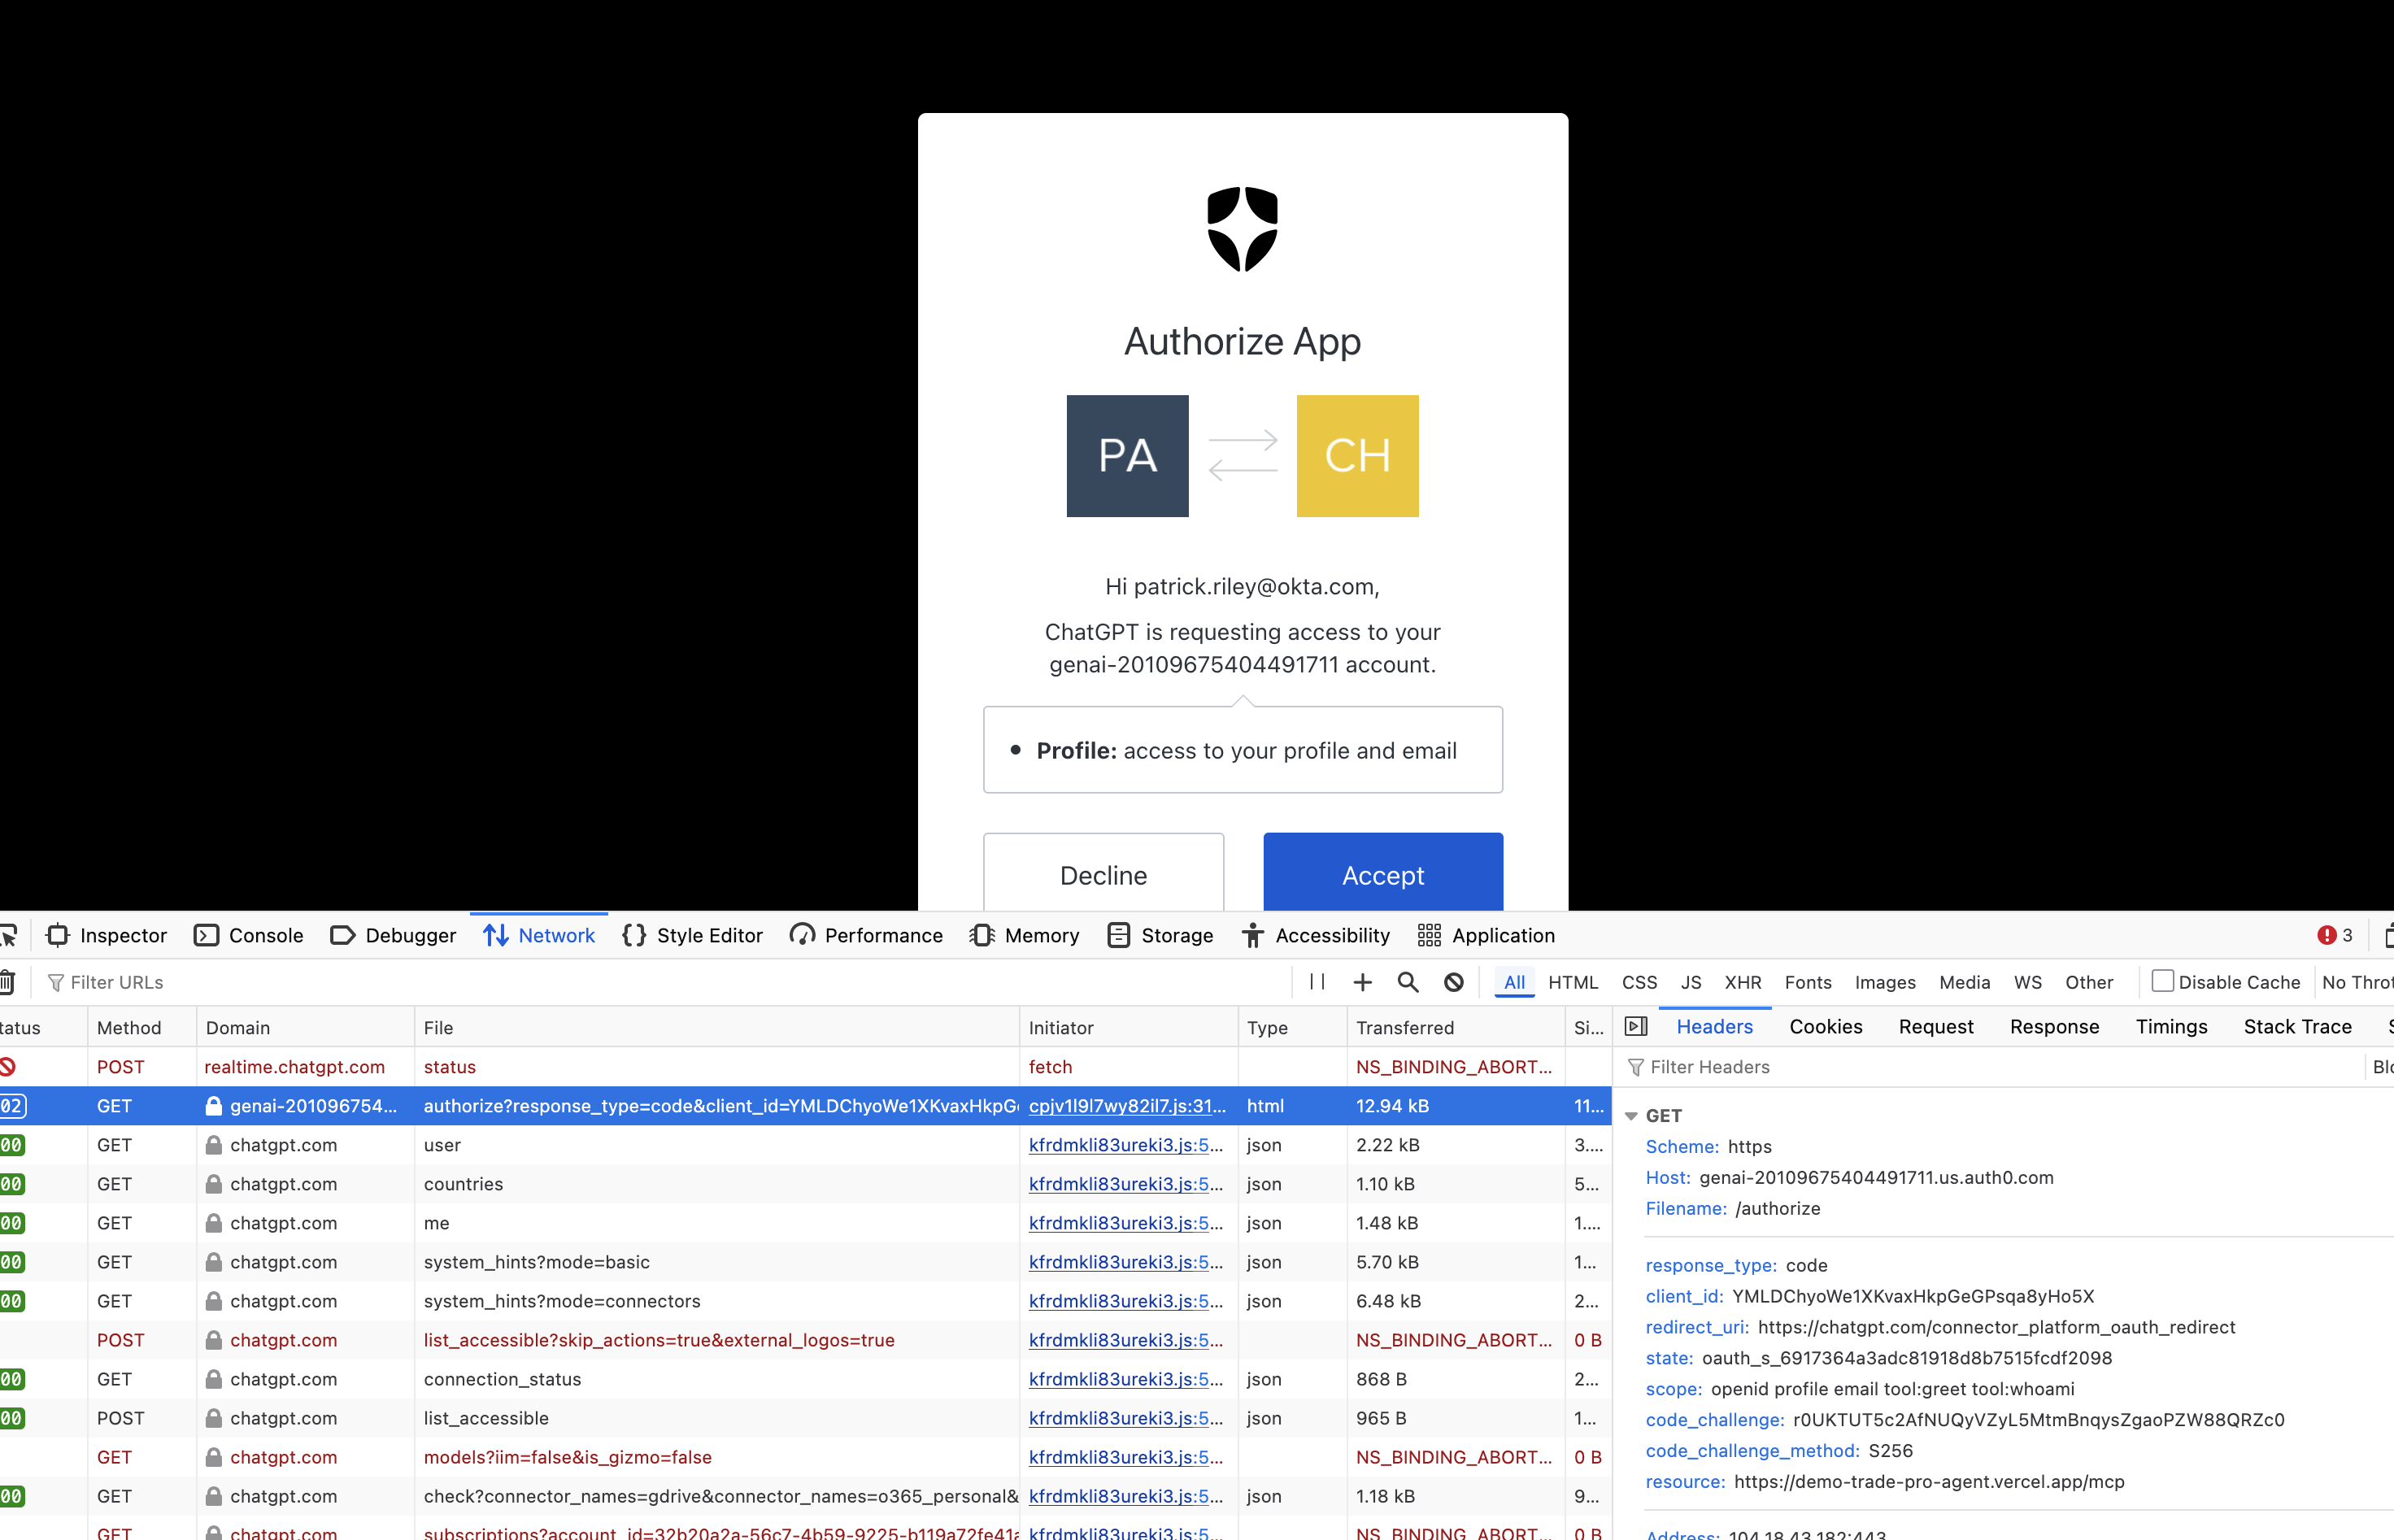
- View the Network tab in your browser. This can sometimes give subtle hints if the connector is failing, particularly around the
/authorizerequest with Auth0 or any subsequent ChatGPT requests.
You'll see a log like this on the Auth0 side when everything is working correctly:
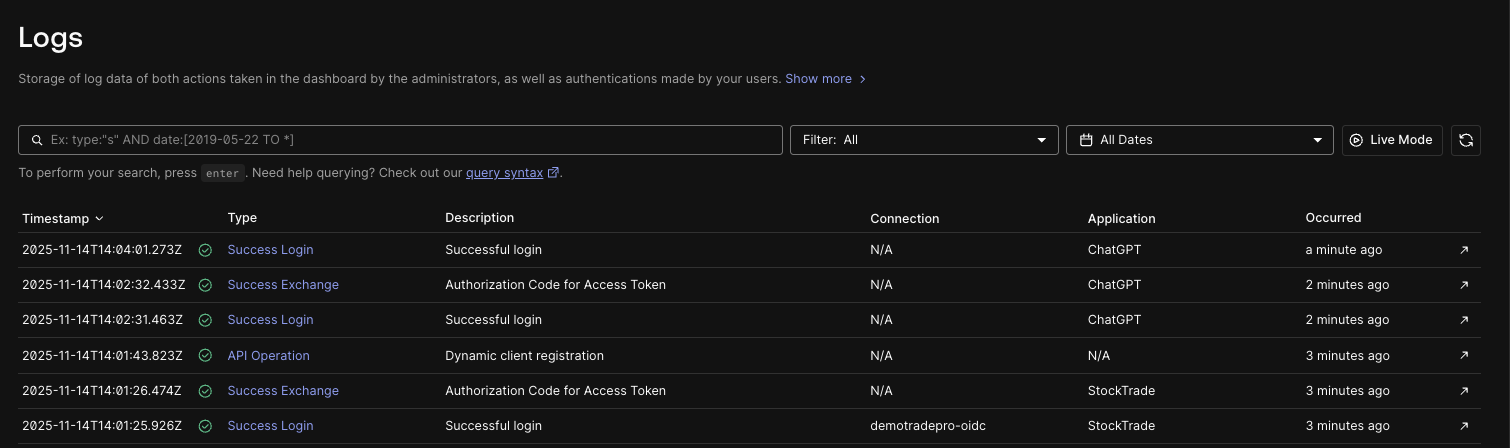
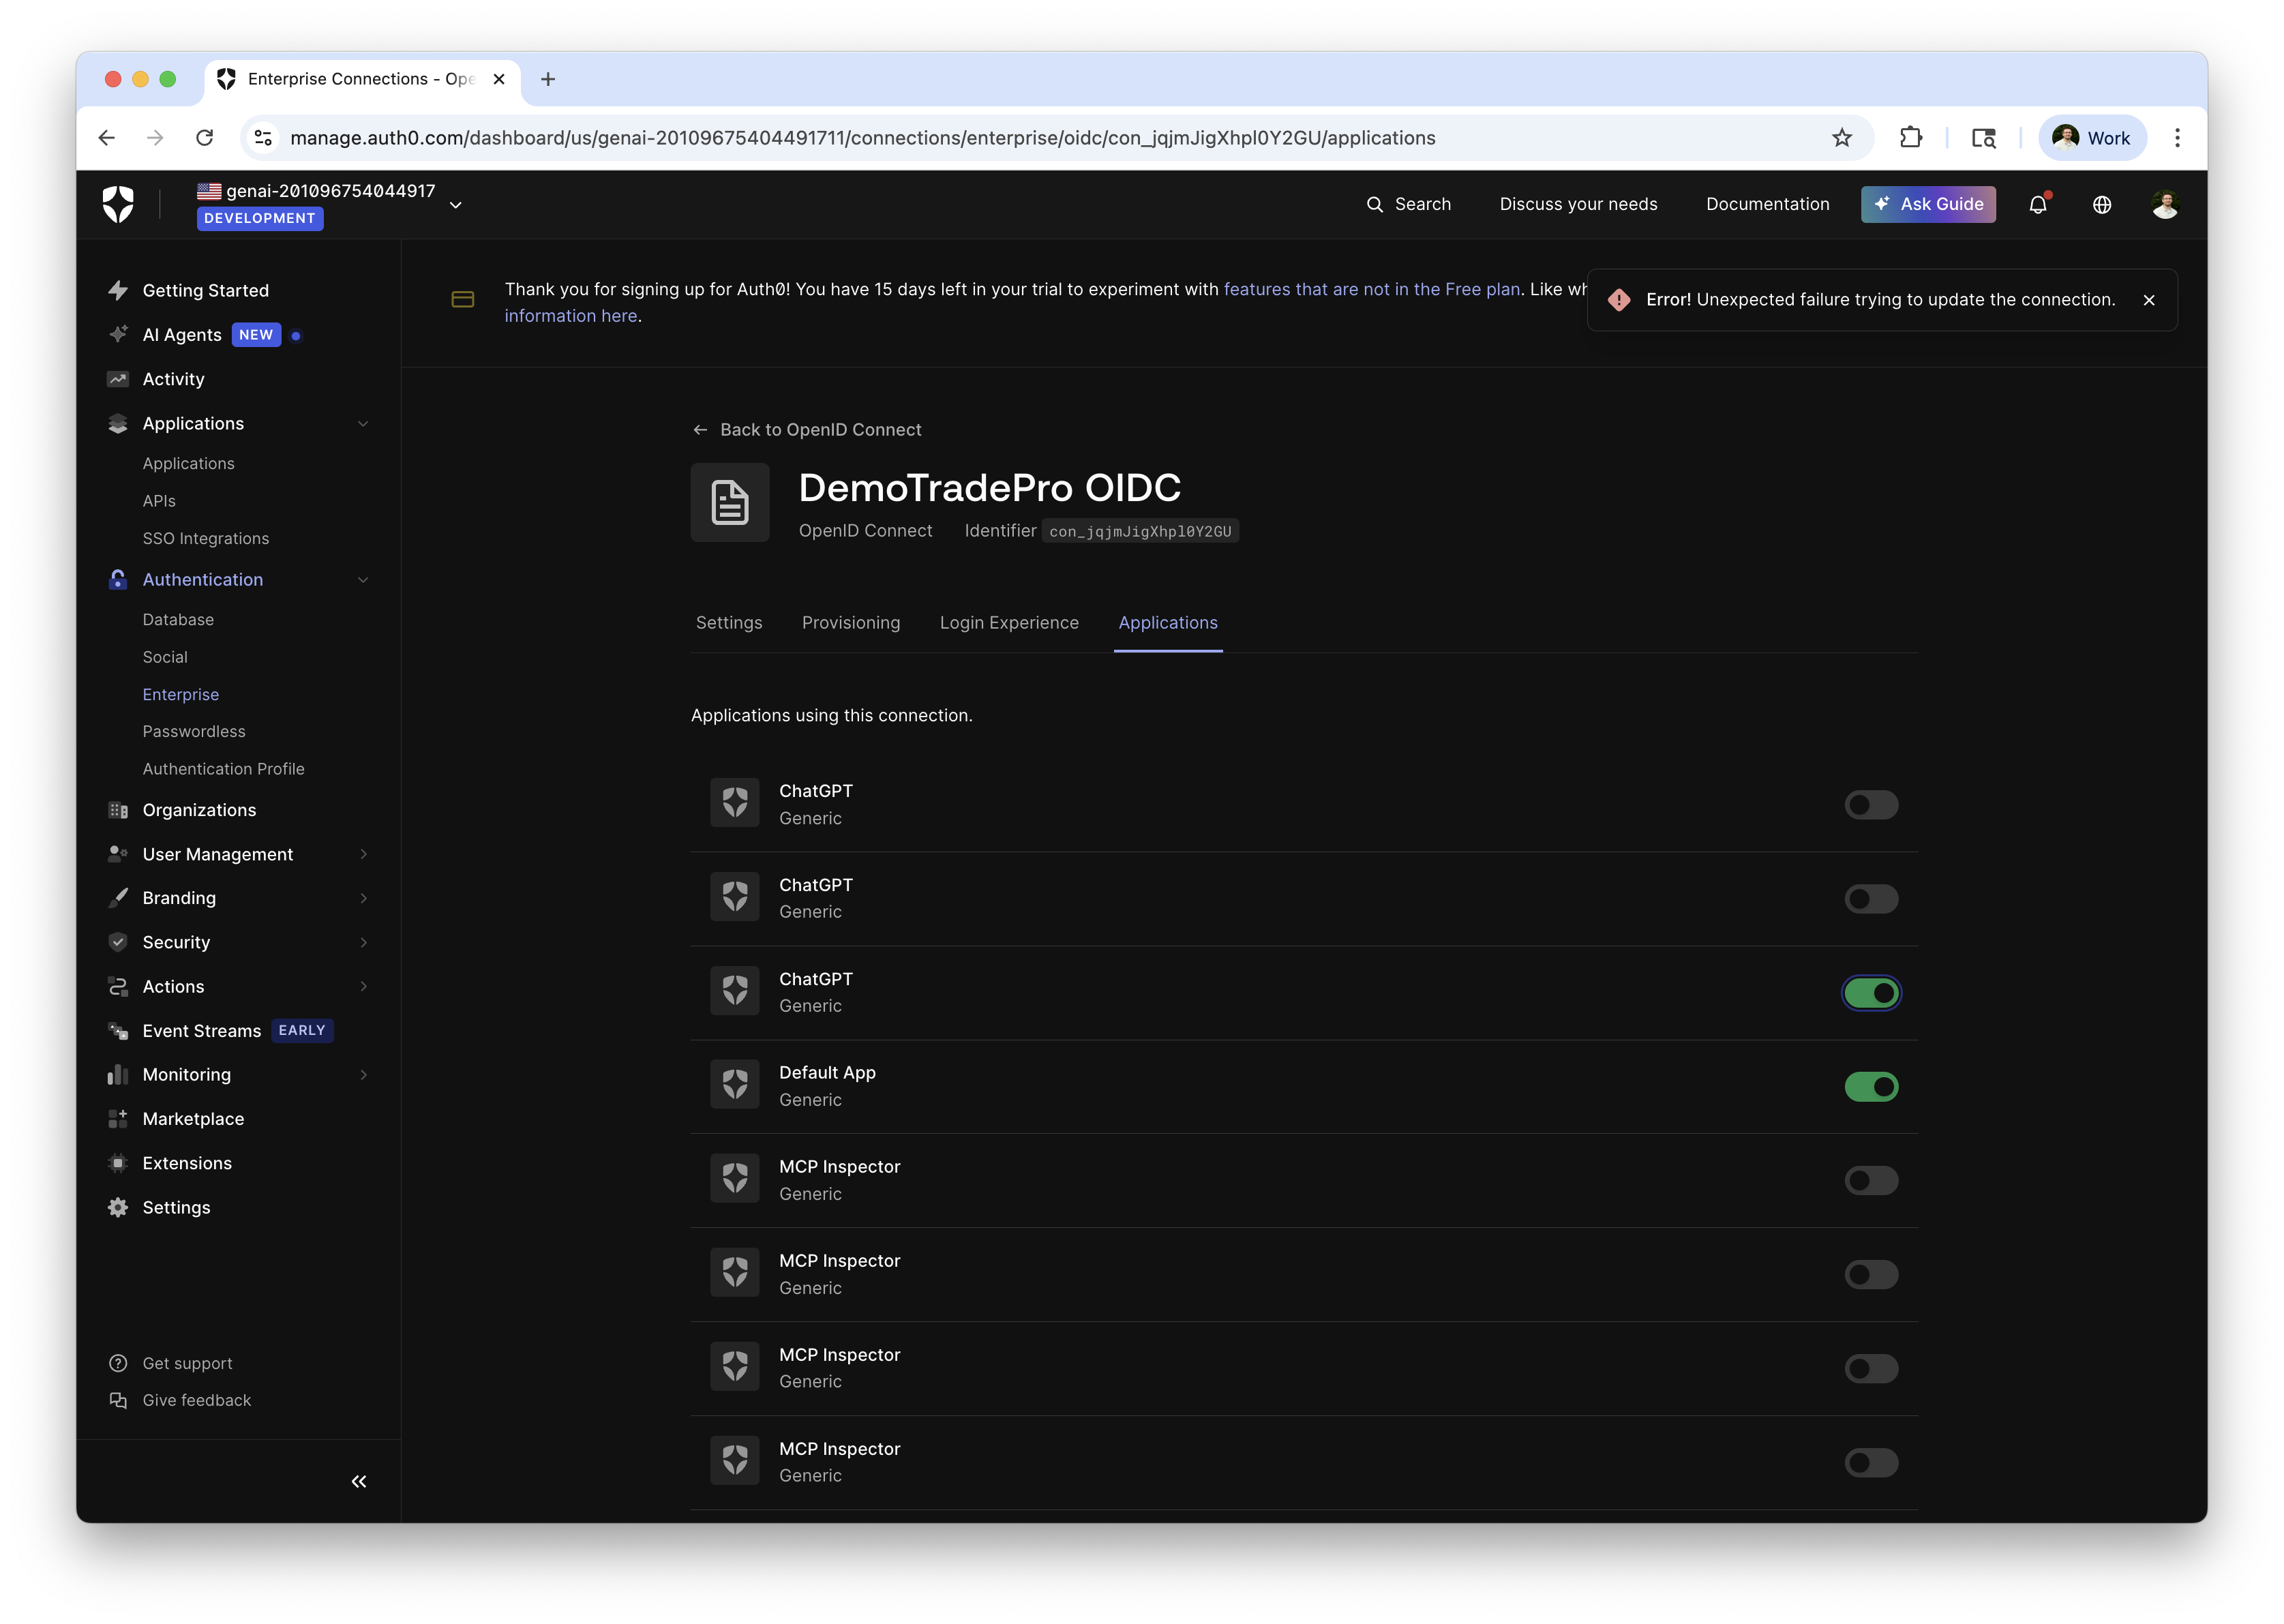
Additionally you'll see the new ChatGPT Third-Party Application created in your Auth0 tenant. The OIDC connection used will also show ChatGPT as a connected application after it has been used.
Claude Code Integration
By now you are starting the see the power of your MCP Server and how it can be integrated with popular AI-native tools. 💥
Next up is Claude Code, which is Anthropic's new AI-native terminal & IDE environment that allows you to use Claude and your MCP servers directly as you code in your IDE or work in your terminal. For simplicity, we'll focus on the terminal integration here, but the IDE integration is quite similar.
Here are the prerequisites you'll need to get started with Claude Code integration:
- An
Anthropic account. Any level of account access with API credits will do.
- Claude Code installed. Review the installation instructions in the
Claude Code overview. I opted to install with Homebrew on macOS:
brew install --cask claude-codeWith Claude Code installed, you can launch the terminal application and get started.
$ claudeYou'll need to complete a basic Login flow then to login to your Anthropic account. This is pretty straight-forward and I will leave you to ensure this.
Now let's integrate your MCP Server with Claude Code. This is a piece of cake now that your MCP server implements a standard protocol! 🍰
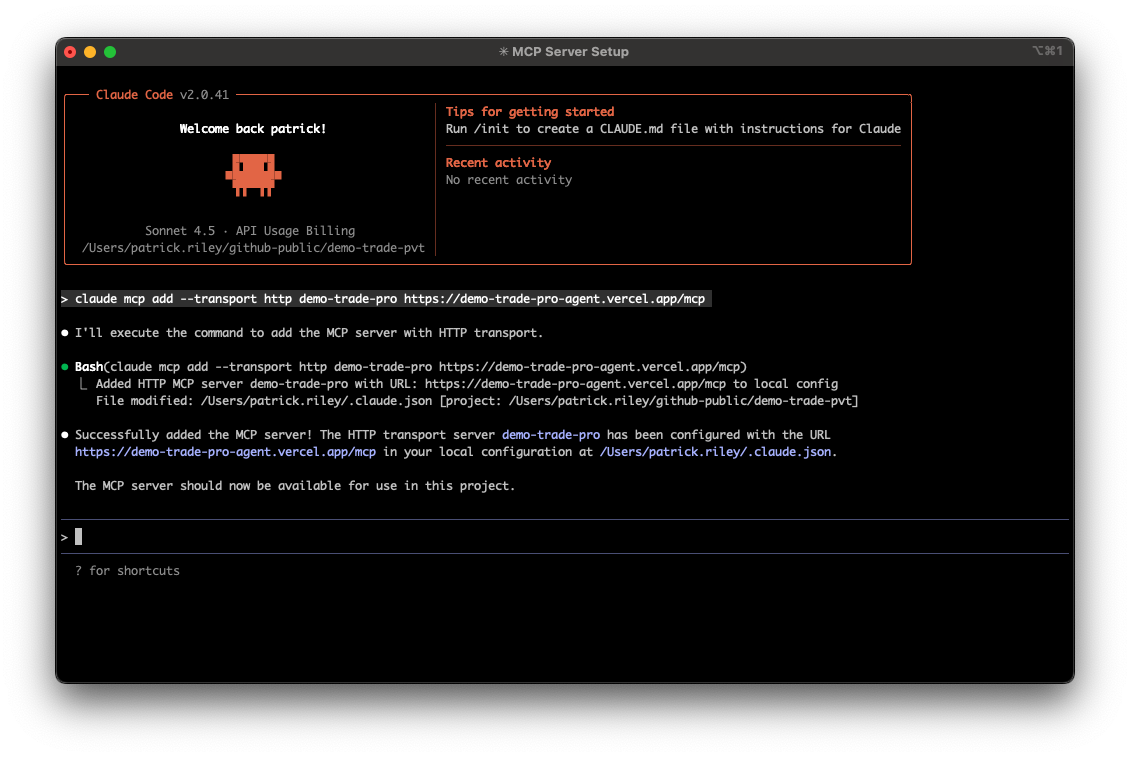
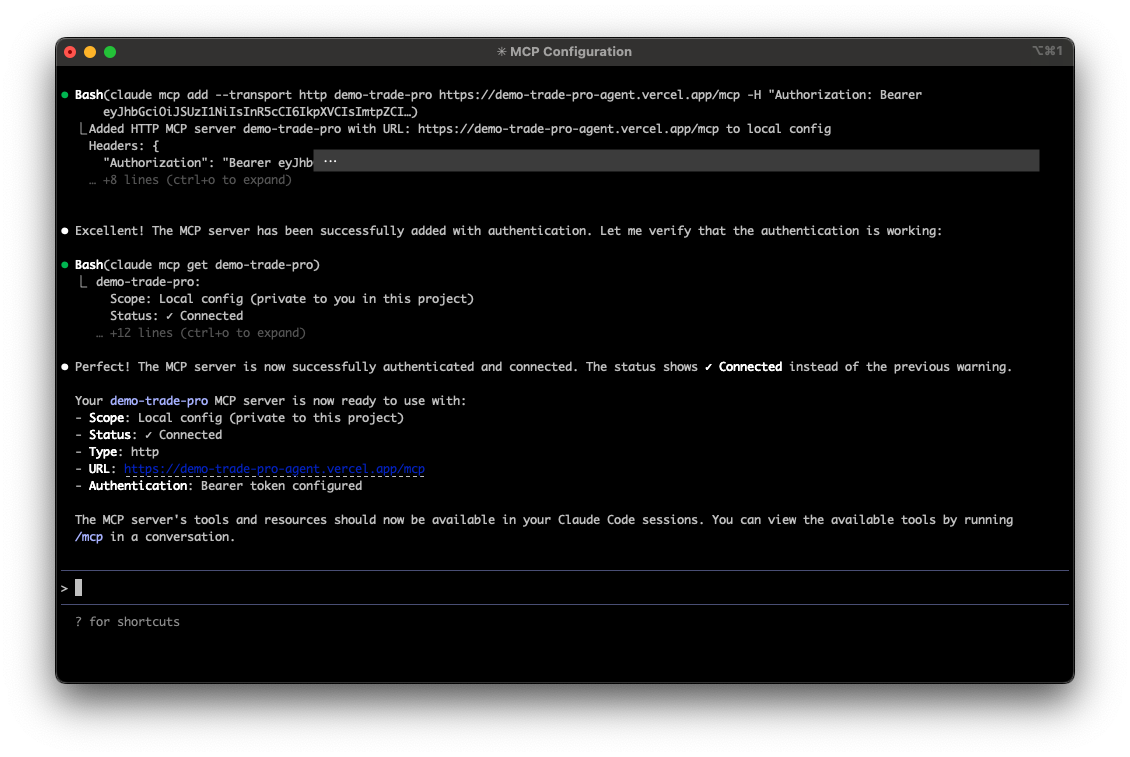
The claude mcp add command enables you to register your MCP Server with Claude Code.
Simply run the following command, specifying your MCP Server URL:
$ claude mcp add --transport https://demo-trade-pro-agent.vercel.app/mcpYou should see that the MCP Server has been added successfully:
Note: you haven't yet authorized any of the tools to be used by Claude Code at this point and you'll later be prompted to do so when you first try to use a protected tool. I prefer to authorize using my MCP Inspector access token for simplicity up front using the -H "Authorization: Bearer <token>" arg with this command, but you can also authorize using the standard OAuth flow if you prefer. There is some additional documentation about this in the Claude Authenticate with Remote MCP Servers documentation.
You'll see a message like this once the MCP server has been authenticated:
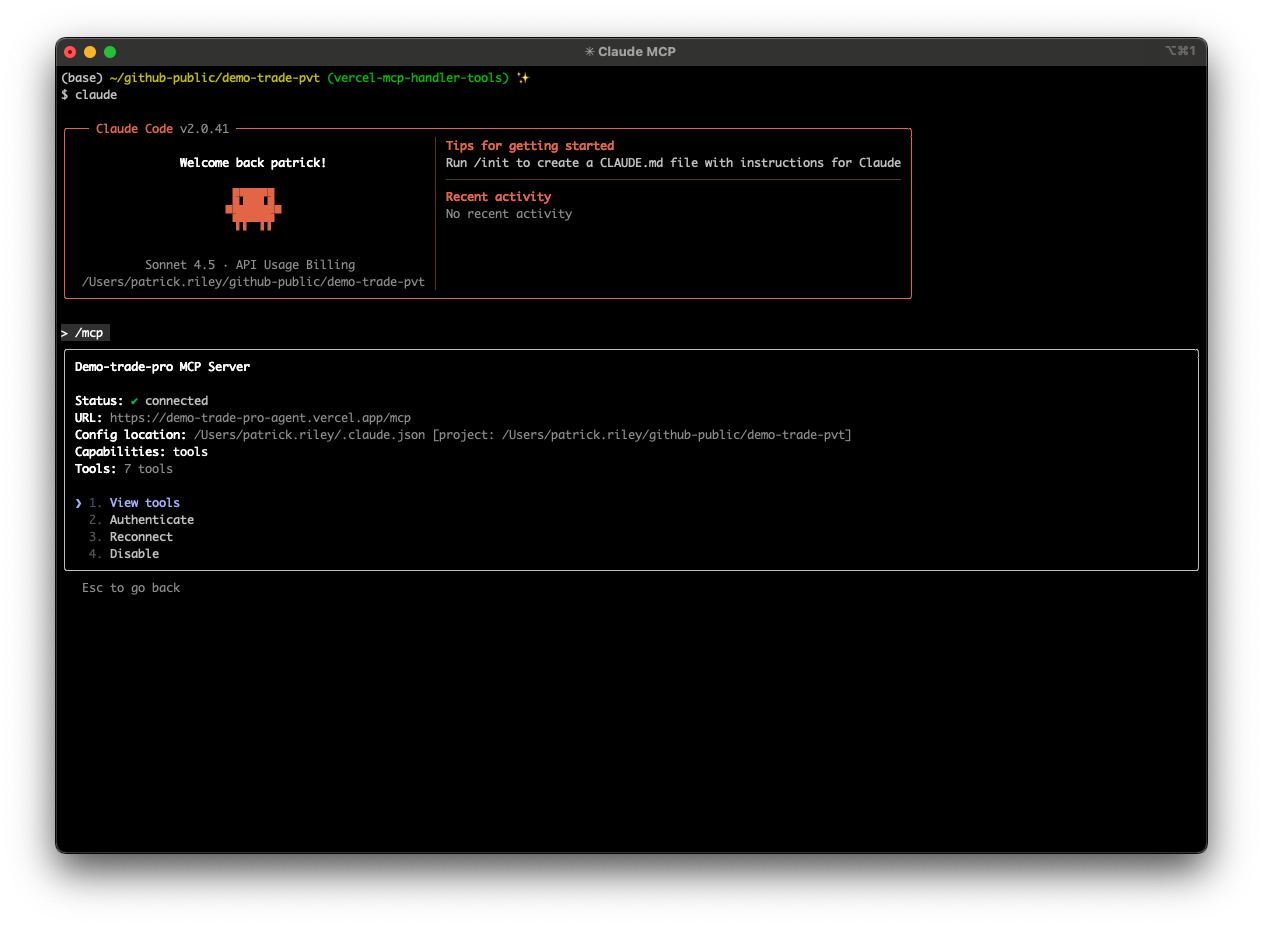
Now with the MCP Server added, sometimes you may need to restart Claude for the settings to take effect and the /mcp command to become available. Simply exit out with Ctrl+C and restart claude in your terminal.
Next, let's make sure the MCP Server is enabled and ready to be accessed. Run /mcp and ensure you have the DemoTradePro MCP server enabled:

Finally, we are ready to start consuming tools.
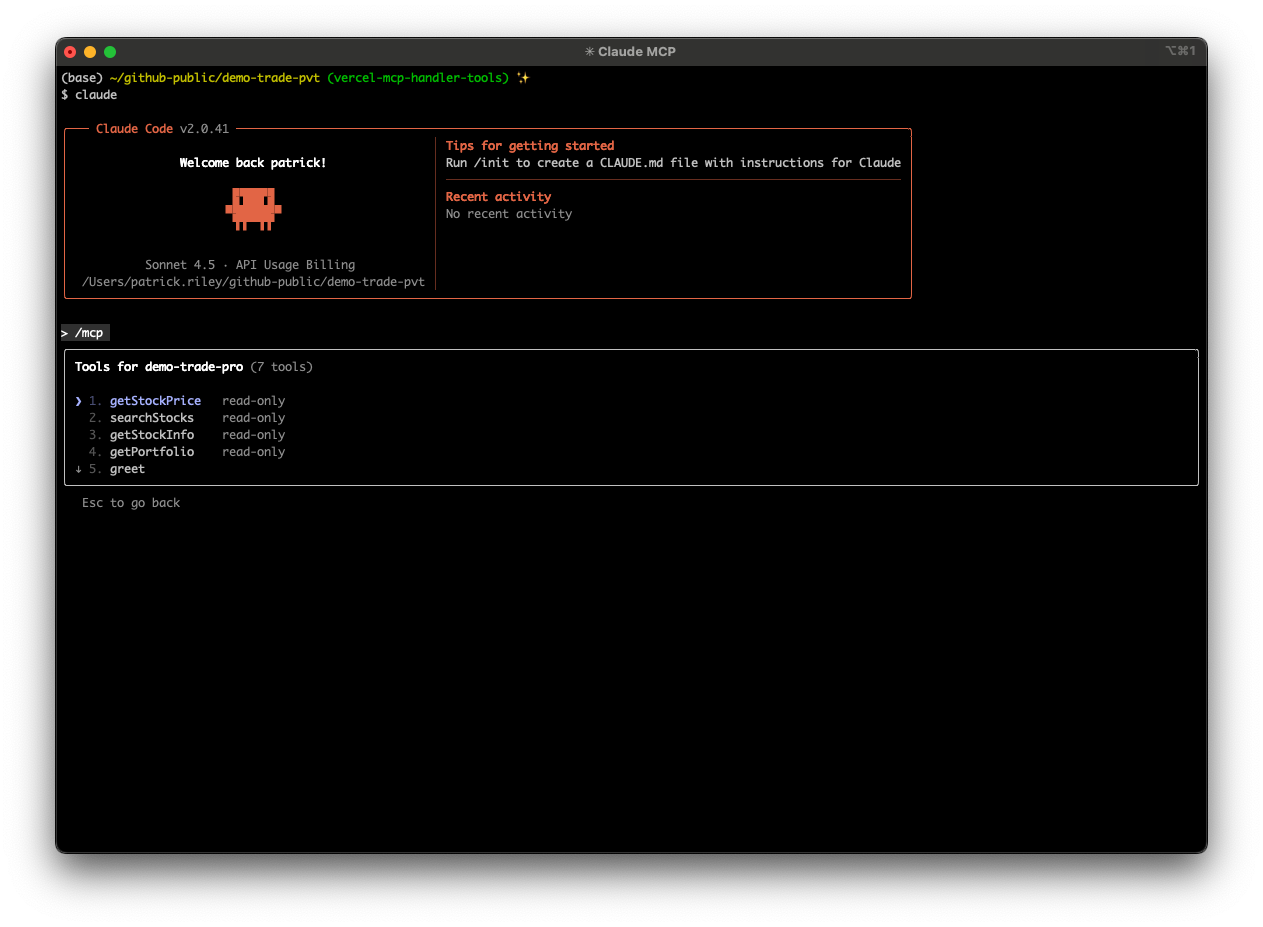
Again, you can run the /mcp command to view your available tools:
Now, let's execute one by using the @demo-trade-pro resource reference in a new prompt:
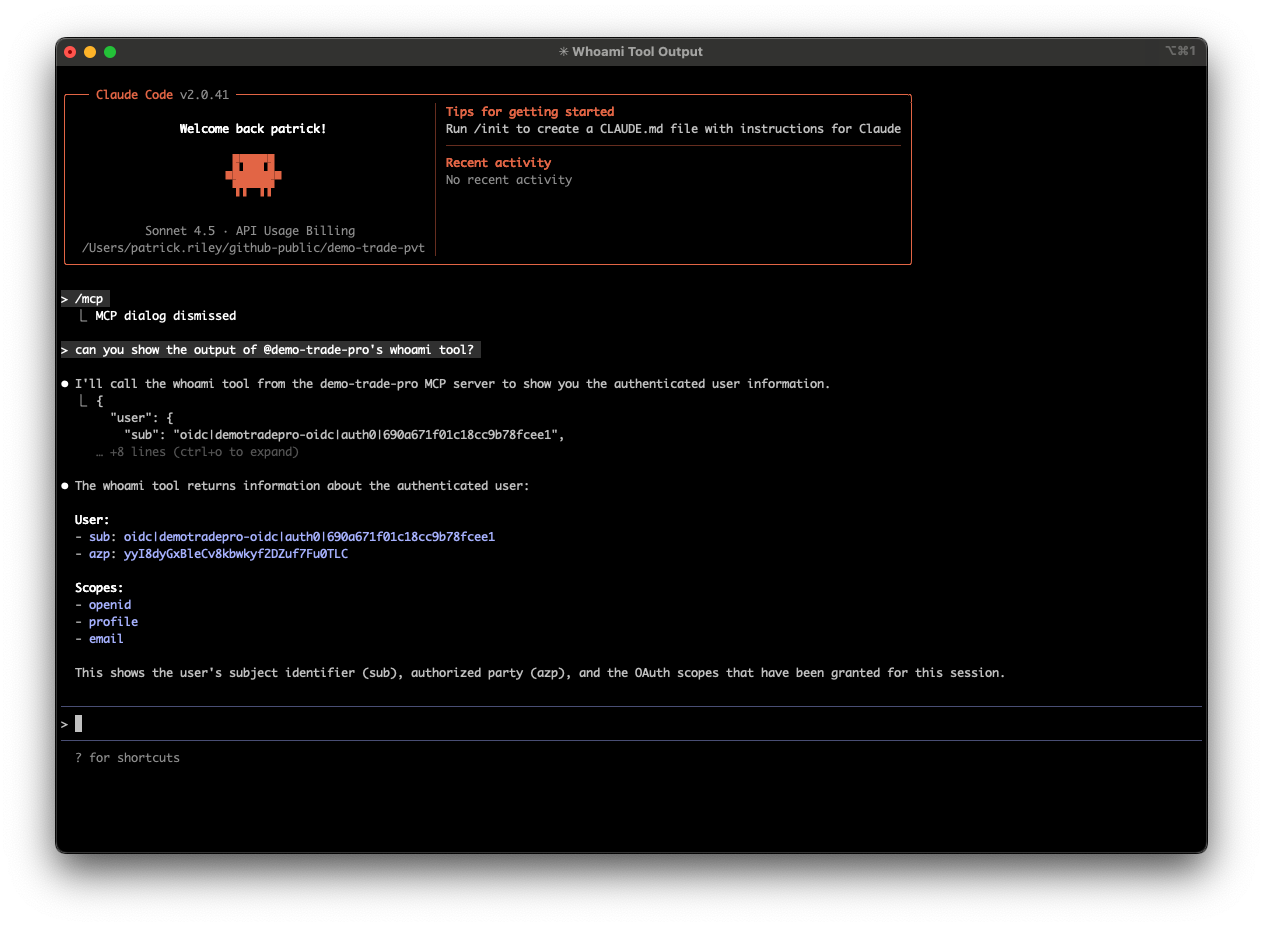
🎈Hooray!! We are off and running with Claude. 🎉
Further documentation on using MCP resources can be found here: Use MCP Resources.
You can also find it interesting that you can now use your MCP Server directly with the Claude Messages API using an MCP Connector or with other agentic frameworks that support Anthropic models. Your MCP server has truly become an AI-native context provider! 🚀
📚 Closing & Further Resources
I hope you've enjoyed this workshop and have learned a lot about building AI-native tools and platforms using MCP Servers, Auth0, and popular AI-native clients like ChatGPT and Claude.
Here is a list of further resources to continue your learning journey in this area which you may find useful:
Auth0 AI - official Auth0 AI developer resources when using the Auth0 platform.
-
Model Context Protocol (MCP) Official Site
-
Vercel AI SDK5 Documentation
-
-
Anthropic MCP Documentation
-
Extending GitHub Copilot Chat with Model Context Protocol (MCP) servers